

Installing windows is one of the final stages that starts turning a framed and sided shed into a usable building.
A properly installed shed window should sit square in its opening, operate correctly and be detailed so water is directed away from the wall rather than into it.
There are several types of shed windows, including purpose-built shed windows, standard windows adapted for an outbuilding and simple site-built wooden windows. The installation method depends on the window and the wall construction.
Before you begin, check the window manufacturer's instructions and your shed plans. Window dimensions, fastening points, flashing details and required clearances can vary between products.
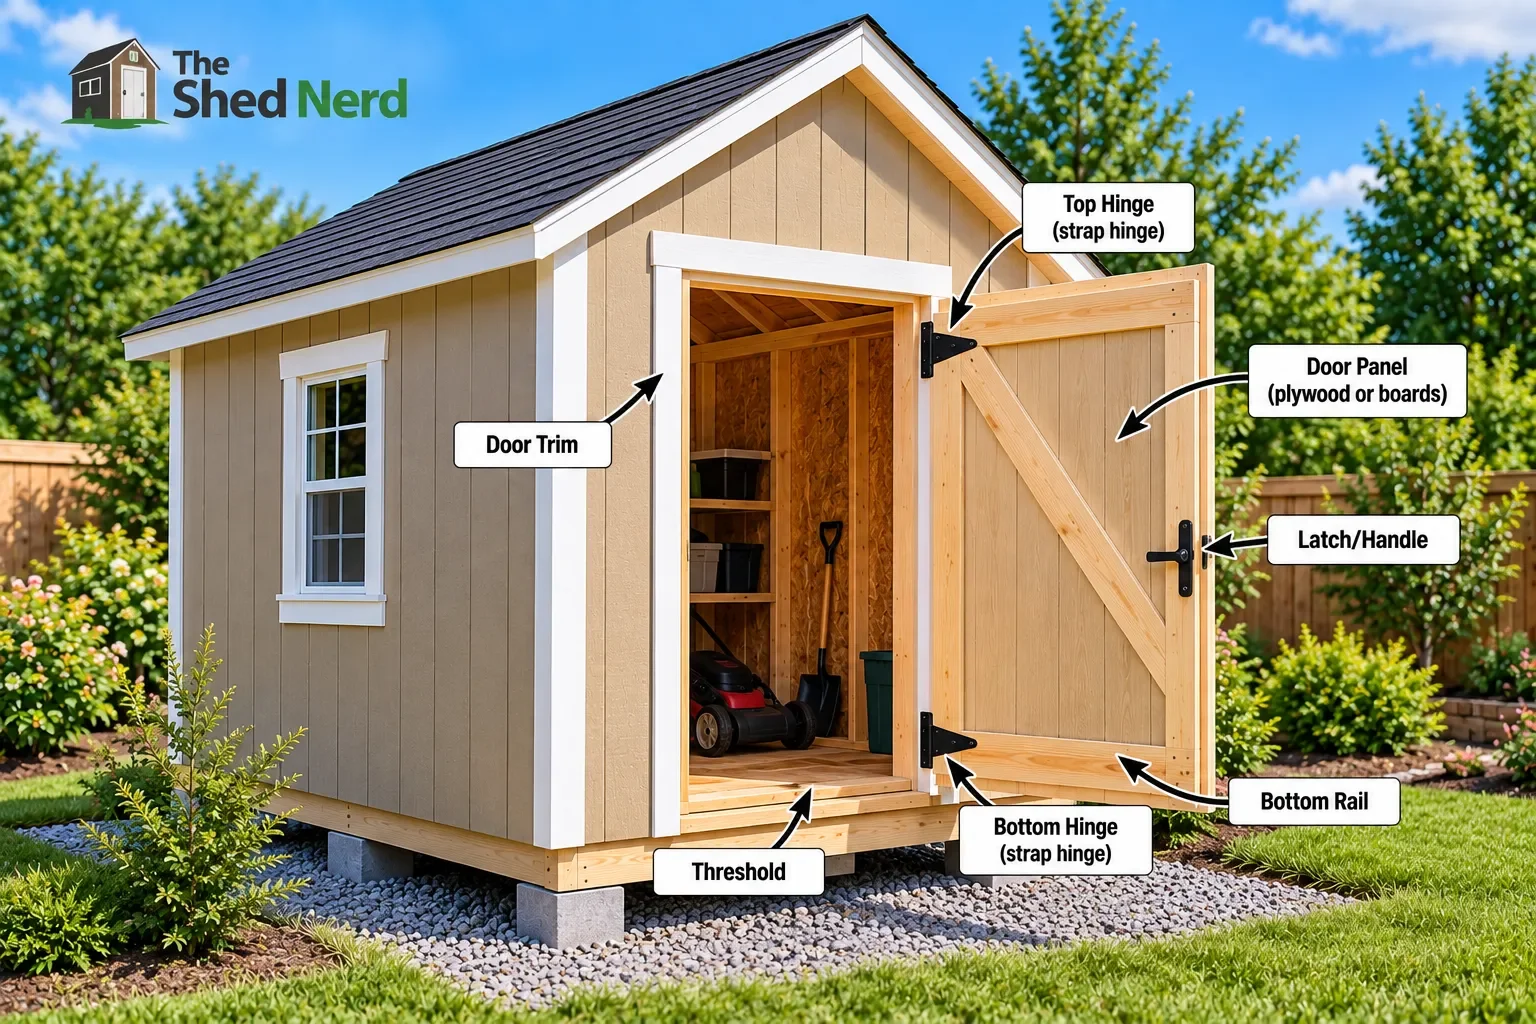
If you've completed the shed door, you're ready for the next stage of the
Shed Building Guide: From Foundation to Finished Shed.
1. Check the Shed Window Opening
Before installing the window, inspect the opening that was created when the shed walls were framed.
The opening should be:
correctly sized
level
plumb
square
properly supported
free from damaged or protruding material
Measure the opening rather than assuming it matches the dimensions on the original plans.
Check both diagonals of the opening. If the measurements are equal, the opening is square.
This is particularly important because a window that is installed into an out-of-square opening may be difficult to operate and harder to seal properly. Current window-installation guidance similarly recommends checking level, plumb and square before permanently securing the unit.
If the opening needs correction, fix it before installing the window.
Our guide to How to Frame Shed Walls explains how door and window openings are incorporated into the wall framing.
2. Choose the Right Shed Window
The window you choose should suit the shed's purpose and the opening that has been framed.
Common options include:
Fixed window
A fixed window doesn't open. It's useful when the main purpose is to bring natural light into the shed.
Awning or hinged window
A hinged window can provide ventilation as well as light.
Sliding window
A sliding window opens horizontally and can work well where there isn't much exterior space.
Site-built wooden window
Some shed plans use a simple timber frame with glass or another transparent panel.
For a DIY project, a purpose-built window can simplify installation, while a site-built window gives you more control over the dimensions and appearance.
3. Gather the Tools and Materials
The exact materials depend on the window system you're installing.
Typical tools may include:
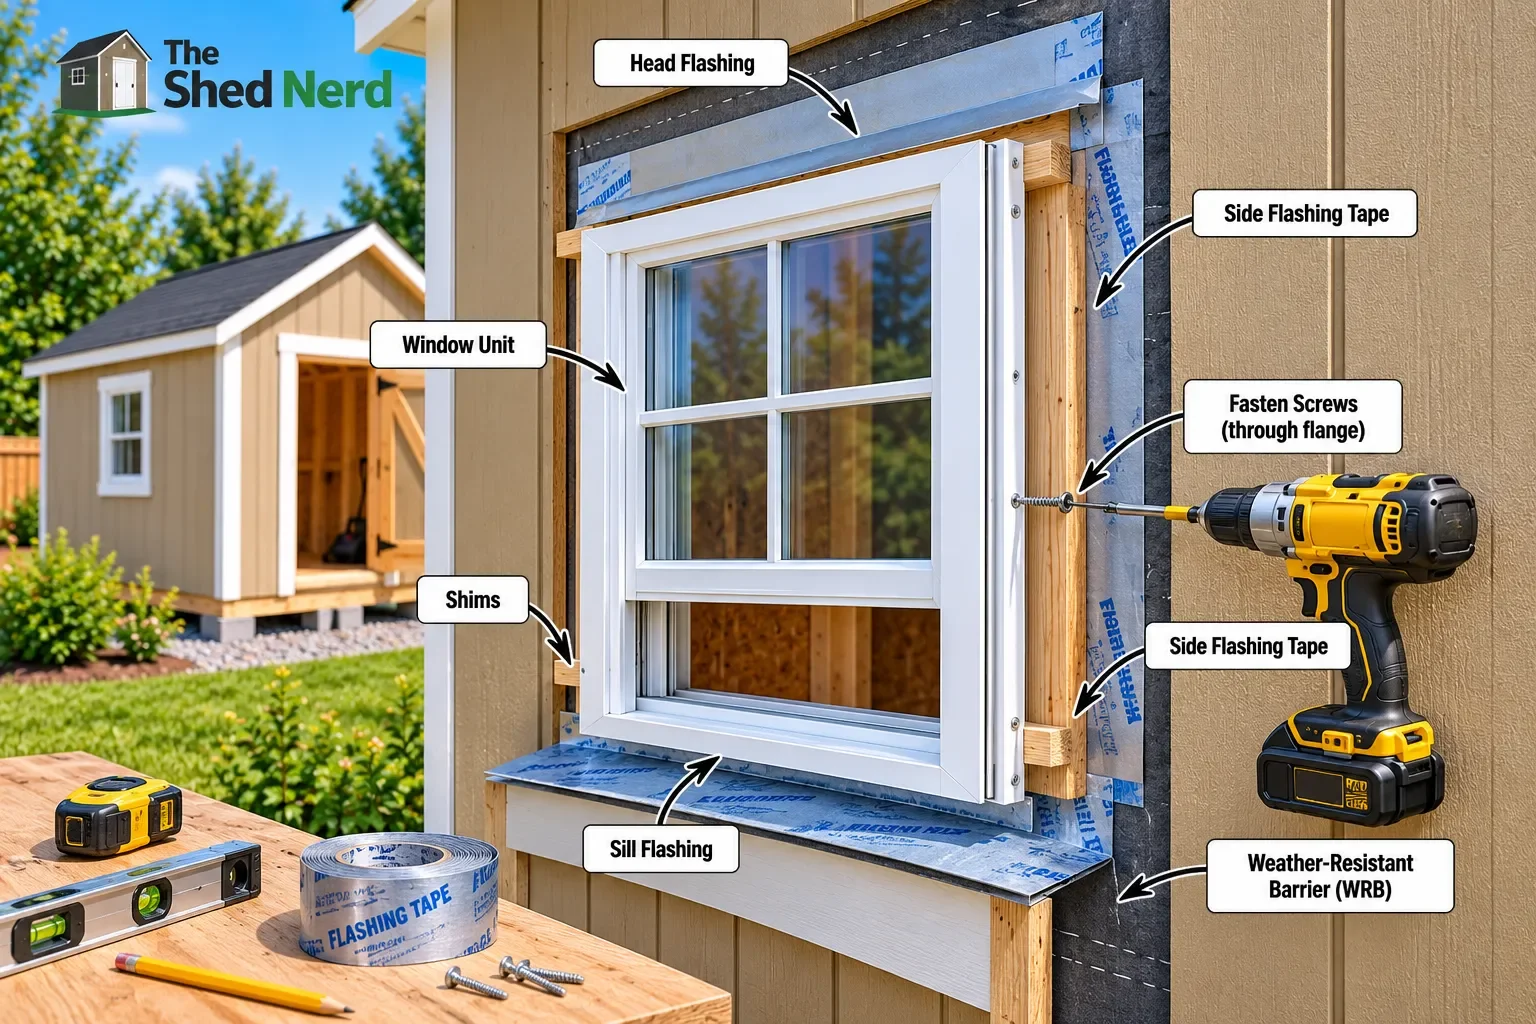
tape measure
level
framing square
drill/driver
screwdriver
utility knife
caulk gun
shims
pencil
appropriate fasteners
Depending on the installation, you may also need:
flashing tape
weather-resistant barrier
exterior sealant
window trim
sill pan or sill flashing
head flashing
insulation material
Current installation guidance identifies flashing, weather-resistant barriers, shims, sealant and exterior trim as common components of a new-construction window installation.
Use the products specified by your window and siding manufacturers rather than treating this list as a universal materials schedule.
4. Prepare the Opening for Water Management
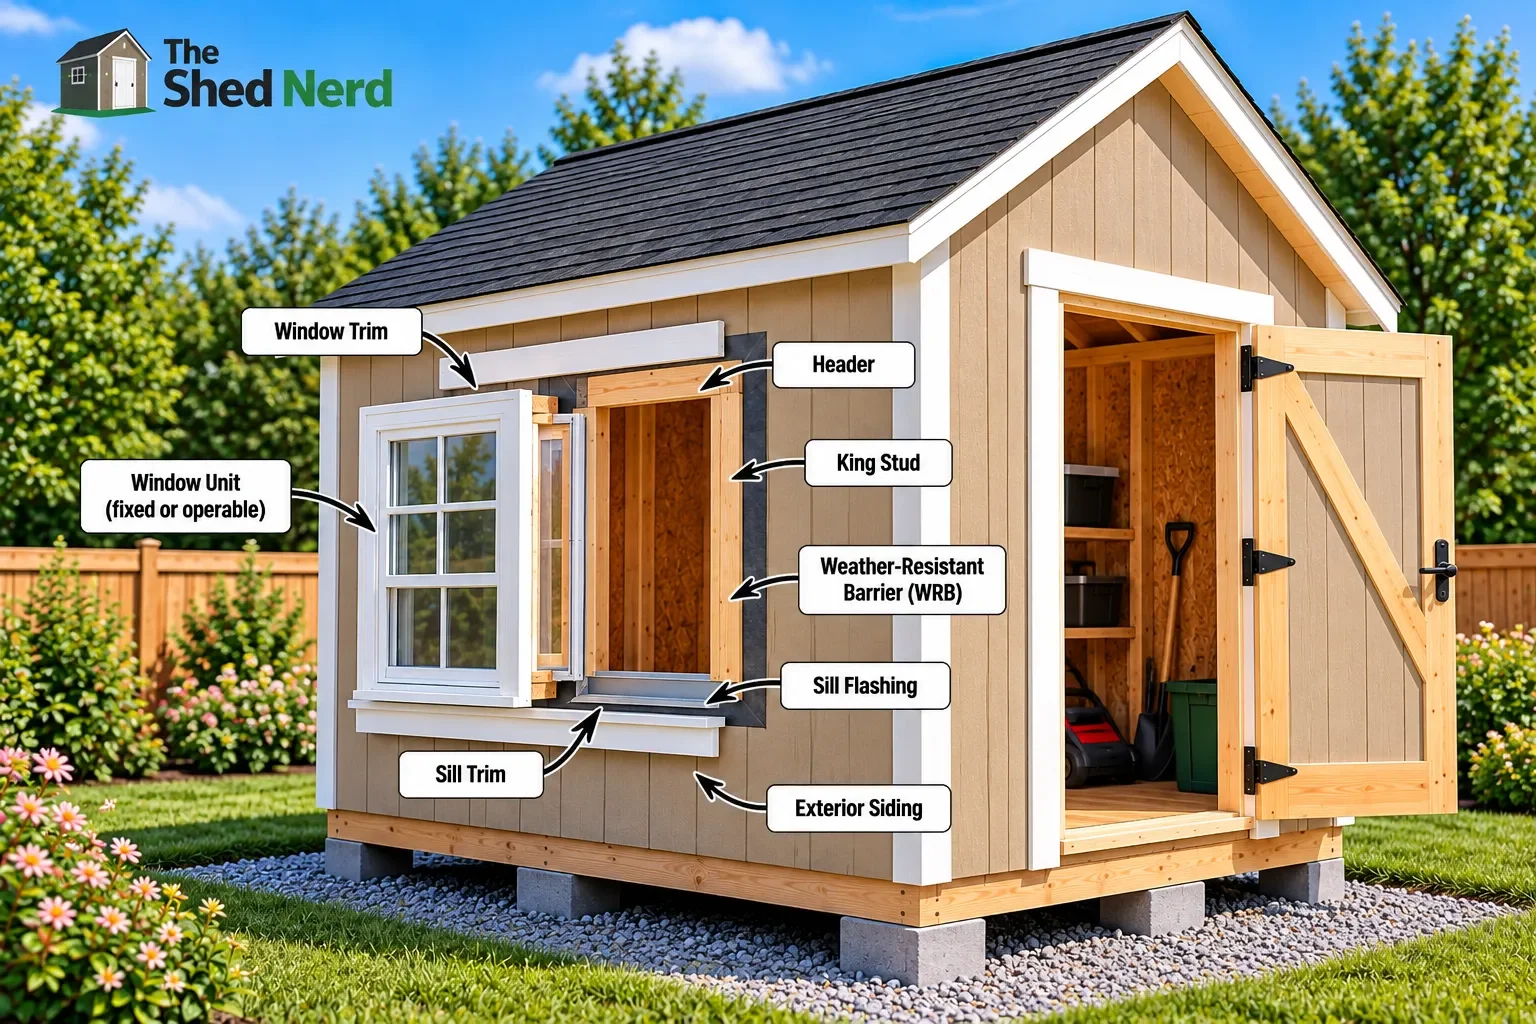
Before putting the window into the opening, prepare the area so water can be directed away from the wall.
This is one of the most important parts of the installation.
Depending on the wall and window system, preparation may include:
weather-resistant barrier
sill flashing
flashing tape
sealant
a sill pan
properly layered flashing around the opening
The basic principle is water should be able to drain outward rather than becoming trapped behind the window or siding.
For new-construction windows, current Lowe's guidance describes preparing the weather-resistant barrier, installing sill flashing, then installing the window and integrating side and head flashing with the wall's water-management system.
The exact sequence varies by product, so follow the window manufacturer's instructions.
5. Install the Sill Flashing
The bottom of the window opening deserves particular attention because water that reaches this area needs a path to the exterior.
Depending on the window system, this may be accomplished with flashing tape, a sill pan or another approved flashing method.
Install the sill flashing so it covers the required portion of the opening and integrates with the wall's weather-resistant barrier.
Avoid creating a detail where water can become trapped behind the flashing.
The flashing should work with the layers above it so water is directed outward.
Current window installation guidance places sill flashing before the window is installed and emphasizes overlapping the water-management layers correctly.
6. Test-Fit the Window
Before applying permanent sealant or fastening the window, place it into the opening to check the fit.
Look at:
side clearance
top clearance
sill position
exterior alignment
interior alignment
Don't force a window into an opening that's too small.
Likewise, a very large gap should not simply be filled with sealant.
If the opening doesn't match the window requirements, correct the opening or use the installation method specified by the manufacturer.
A test fit at this stage can prevent a lot of problems later.
7. Position the Window With Shims
Place the window into the prepared opening and use shims where required.
Check the window carefully with a level.
The window should be:
level
plumb
square
correctly positioned within the wall
Measure the diagonals of the window frame to help confirm that it is square. Current installation guidance recommends using shims to make adjustments and checking the frame's level, plumb and diagonal measurements before final fastening.
Don't use excessive force to straighten the window.
Shims should support and position the unit without distorting the frame.
8. Secure the Window
Once the window is correctly positioned, secure it according to the manufacturer's instructions.
The appropriate fasteners and fastening locations depend on the window design.
Some windows are secured through mounting flanges, while others are fastened through the frame into the surrounding structure.
The important thing is that the fasteners connect the window to suitable structural framing rather than simply relying on the siding.
Follow the manufacturer's specified screw or nail type, spacing and installation points. Current window installation guidance specifically recommends following the manufacturer's requirements for fasteners, sealing and installation.
9. Check the Window Before Finishing
Before covering the installation with trim, operate the window.
Open and close it several times if it is designed to open.
Check:
the sash moves freely
the latch works
the window remains square
the frame hasn't moved during fastening
there is no binding
the window sits correctly against the surrounding wall
This is the last easy opportunity to make adjustments.
If the window binds, don't simply force it.
Check the frame, shims and opening first.
10. Install Side and Head Flashing
Once the window is secured, complete the flashing around the sides and top according to the window manufacturer's instructions.
A common water-management sequence is to integrate the side flashing and then install the head flashing so the upper layer sheds water over the layers below.
Current Lowe's guidance describes installing side flashing followed by top flashing, then integrating the window trim and the weather-resistant barrier.
The exact products and overlaps will vary.
Don't seal or flash the bottom in a way that prevents a designed drainage path from working.
Some window systems deliberately leave portions of the lower assembly open so water can escape.
11. Install the Exterior Window Trim
With the window installed and weatherproofing completed, install the exterior trim.
Trim can:
cover the gap around the window
protect exposed framing
create a finished appearance
provide a clean transition between the siding and window
help direct water away from the opening
The trim should be installed according to the siding and window details.
Where head flashing is required, it should be integrated with the trim rather than simply placed on top as decoration.
Installation guidance for panel siding similarly shows flashing at the top of the opening being integrated with the trim and siding.
12. Seal the Window and Trim
Once the trim is installed, inspect the joints around the window.
Where the manufacturer's instructions call for exterior sealant, use an exterior-rated product suitable for the materials.
Pay particular attention to:
window-to-trim joints
trim-to-siding joints
corners
penetrations
exposed gaps
However, don't caulk every visible joint automatically.
Some window and flashing systems require drainage paths or weep openings to remain open. Sealing a drainage opening can trap water rather than preventing it.
Follow the window manufacturer's sealing instructions.
13. Finish the Interior
Once the exterior is complete, finish the inside of the window opening.
Depending on the shed, this may include:
interior trim
jambs
sill
casing
sealant
paint or finish
The interior finish doesn't need to be complicated in a basic storage shed.
The important thing is to cover exposed framing and create a clean transition between the window and the wall.
14. Install a Site-Built Shed Window
If you're building your own wooden shed window rather than installing a manufactured unit, the process is slightly different.
The basic sequence is:
Build the outer frame.
Check it for square.
Build the inner frame.
Prepare the glazing area.
Install the glass or approved glazing material.
Secure the glazing with the appropriate system.
Install hinges if the window opens.
Add the latch or lock.
Install the completed window into the prepared opening.
Add exterior trim and weather protection.
Don't copy dimensions from another shed window.
The window should be designed around the actual opening and the materials being used.
Common Shed Window Installation Mistakes
Installing the wrong size window
Always measure the actual opening and compare it with the manufacturer's required rough-opening dimensions.
Skipping the test fit
Put the window into the opening before permanently securing it.
Failing to check square
A window can be level and still be out of square.
Over-tightening fasteners
Excessive fastening pressure can distort some window frames.
Ignoring flashing
Siding alone isn't a substitute for properly detailing the window opening.
Sealing drainage paths
Some systems require water to drain from the bottom of the assembly.
Installing trim before checking the window
Make sure the window operates correctly before covering the installation with trim.
Using generic installation details
Different window systems have different requirements. Follow the manufacturer's instructions for the particular window.
How to Maintain Shed Windows
Once the window is installed, maintenance is relatively simple.
Periodically check:
exterior sealant
trim
flashing
hinges
latches
glazing
paint or finish
signs of water entry
Clean the window and inspect the surrounding siding.
If you notice moisture inside the wall, don't simply apply more caulk over the outside.
Find out where the water is entering and correct the underlying detail.
What's Next?
With the shed foundation, floor, walls, roof, siding, door and windows complete, the building is getting very close to finished.
The next stage in the Shed Building Guide: From Foundation to Finished Shed is How to Install Shed Roofing, where we'll cover the roofing materials and installation process that protect the completed roof structure from weather.
If you're working through the guide from the beginning, you can continue through
How to Build a Shed Foundation: 4 Options,
How to Build a Shed Floor Frame,
How to Install Shed Siding and
Final Thoughts
Installing a shed window is about more than simply putting a window into a hole in the wall.
Start with an accurately framed opening, check the fit, prepare the sill and flashing, position the window carefully, use shims where required and secure it according to the manufacturer's instructions.
Then complete the flashing, trim and sealing details so the window works as part of the shed's exterior weather-management system.
Take your time with the measurements and alignment. A correctly installed window should open and close properly, remain square and provide a clean transition between the interior, window and exterior siding.
Once the windows are finished, you're ready to move on to the roofing system and the final stages of the Shed Building Guide.
Ready to Choose Your Shed Plan?
Once you understand the main stages of shed construction, having a detailed plan can make the project easier to organise. Explore different shed sizes, styles and layouts to find a design that fits your project.