

A well-built shed door needs to be strong enough for regular use while remaining square and stable as it opens and closes.
There are several ways to build a shed door, from a simple framed plywood door to a more traditional ledged-and-braced wooden door. The best approach depends on the shed design, door size, siding material and hardware being used.
Before building the door, make sure the shed's rough opening has already been framed correctly. A door that is built around an inaccurate opening can be difficult to install and may not close properly.
If you've completed the siding, you're now ready for the next stage of the
Watch: How to Build a Shed Door
Building a sturdy shed door involves more than attaching boards to a frame. In this video, you'll see how to build a 2×4 door frame, attach the sheathing, reinforce the corners and install the door hardware. It also demonstrates how to hang a single door and build and install double shed doors, including the hardware and weatherproofing details that help create a durable finish.
1. Check the Shed Door Opening First
Before cutting any lumber, measure the opening in the shed.
Don't build the door from the nominal size of the shed alone. Measure the actual finished opening because framing, siding and trim can affect the available space.
Check:
opening width
opening height
left and right sides
top of the opening
threshold
wall thickness
siding and trim
available clearance
Also check that the opening is:
square
level
plumb
properly framed
large enough for the planned door
If you haven't completed the wall framing yet, our guide to How to Frame Shed Walls explains how door openings, headers, studs and wall framing fit together.
The door should be built to the actual opening and the dimensions specified by your shed plans.
2. Choose Your Shed Door Style
There isn't one universal shed door design.
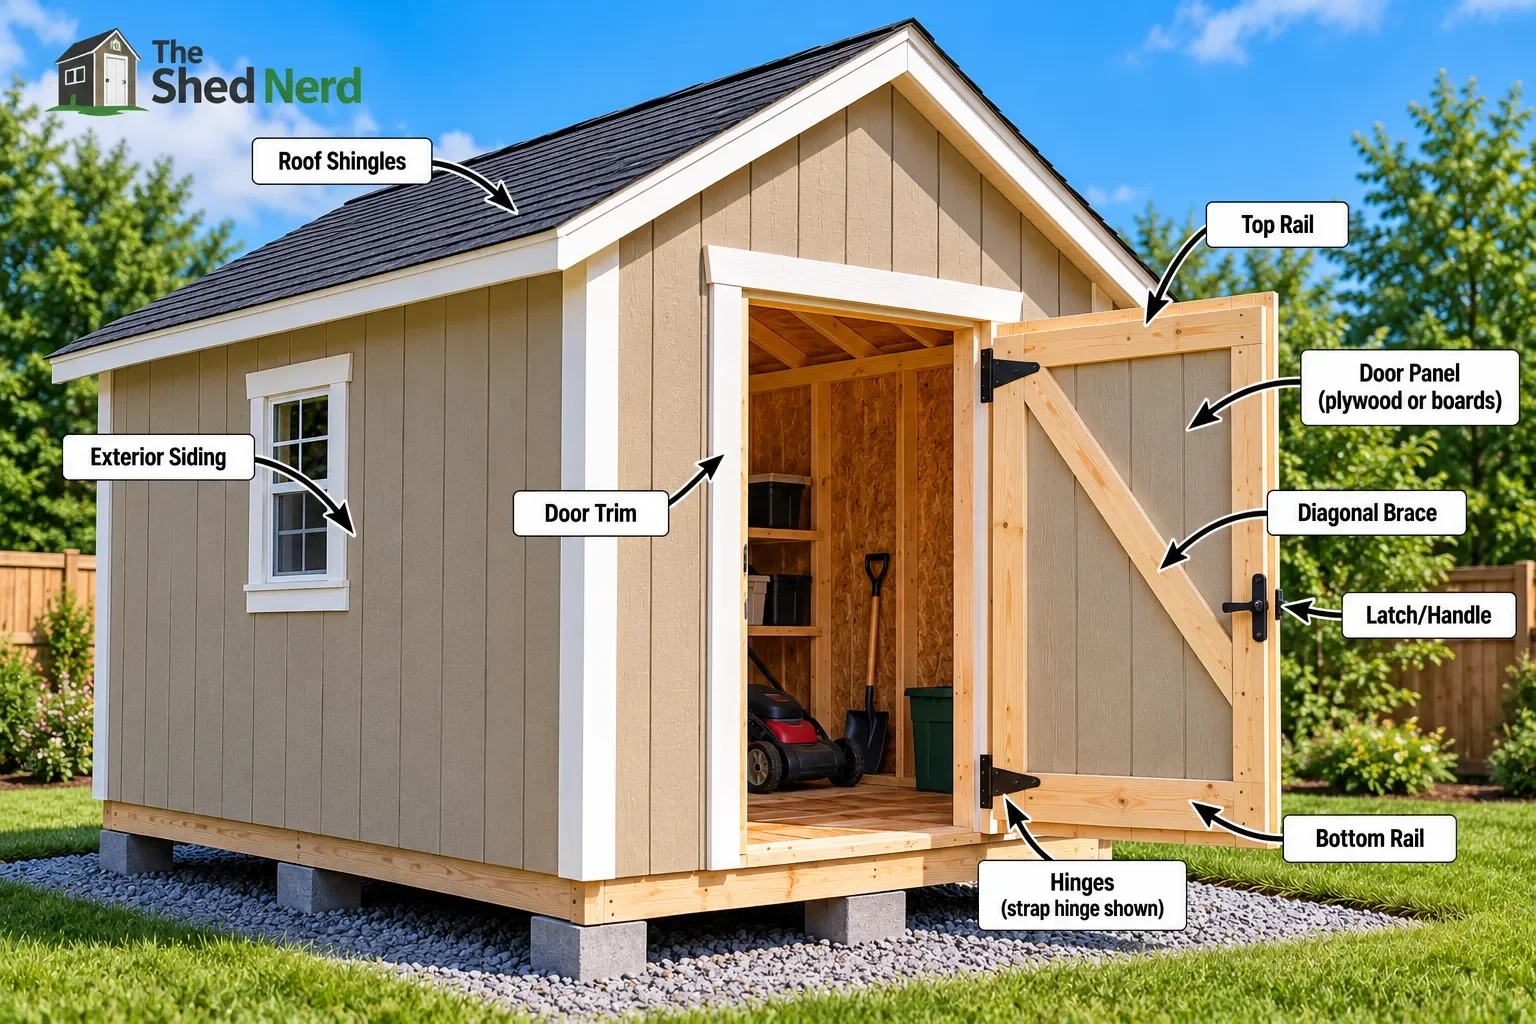
Framed plywood door
A plywood panel attached to a timber frame is one of the simpler approaches. The timber frame provides structure while the exterior panel creates the finished surface.
Ledged and braced door
This traditional design uses vertical boards supported by horizontal ledges, with diagonal bracing helping keep the door square.
It can work particularly well for rustic garden sheds and barn-style buildings.
Double shed doors
Larger openings often use two door leaves rather than one large door.
Double doors can make it easier to move lawn equipment, wheelbarrows, tools and other large items into the shed.
Sliding or barn-style door
A sliding door moves sideways rather than swinging into or away from the shed. This can save interior floor space, but it requires suitable track and mounting hardware.
Exterior sliding barn doors are also used on sheds and outbuildings, with the door, track, rollers and mounting system designed to work together.
For a conventional shed, however, a hinged timber door is usually the simplest design to build.
3. Measure the Door Carefully
Once you've selected the design, transfer the opening measurements to your door plans.
The door needs enough clearance to open and close without binding, but excessive gaps can allow water, dust and pests into the shed.
Your measurements should establish:
overall door width
overall door height
frame dimensions
panel dimensions
hinge positions
latch location
required clearances
If you're building double doors, determine which door will be the active door and which will remain fixed when closed.
Don't assume that a door advertised as a particular size will fit an opening of exactly the same nominal dimensions.
Measure the actual opening and follow the door dimensions shown in your plans.
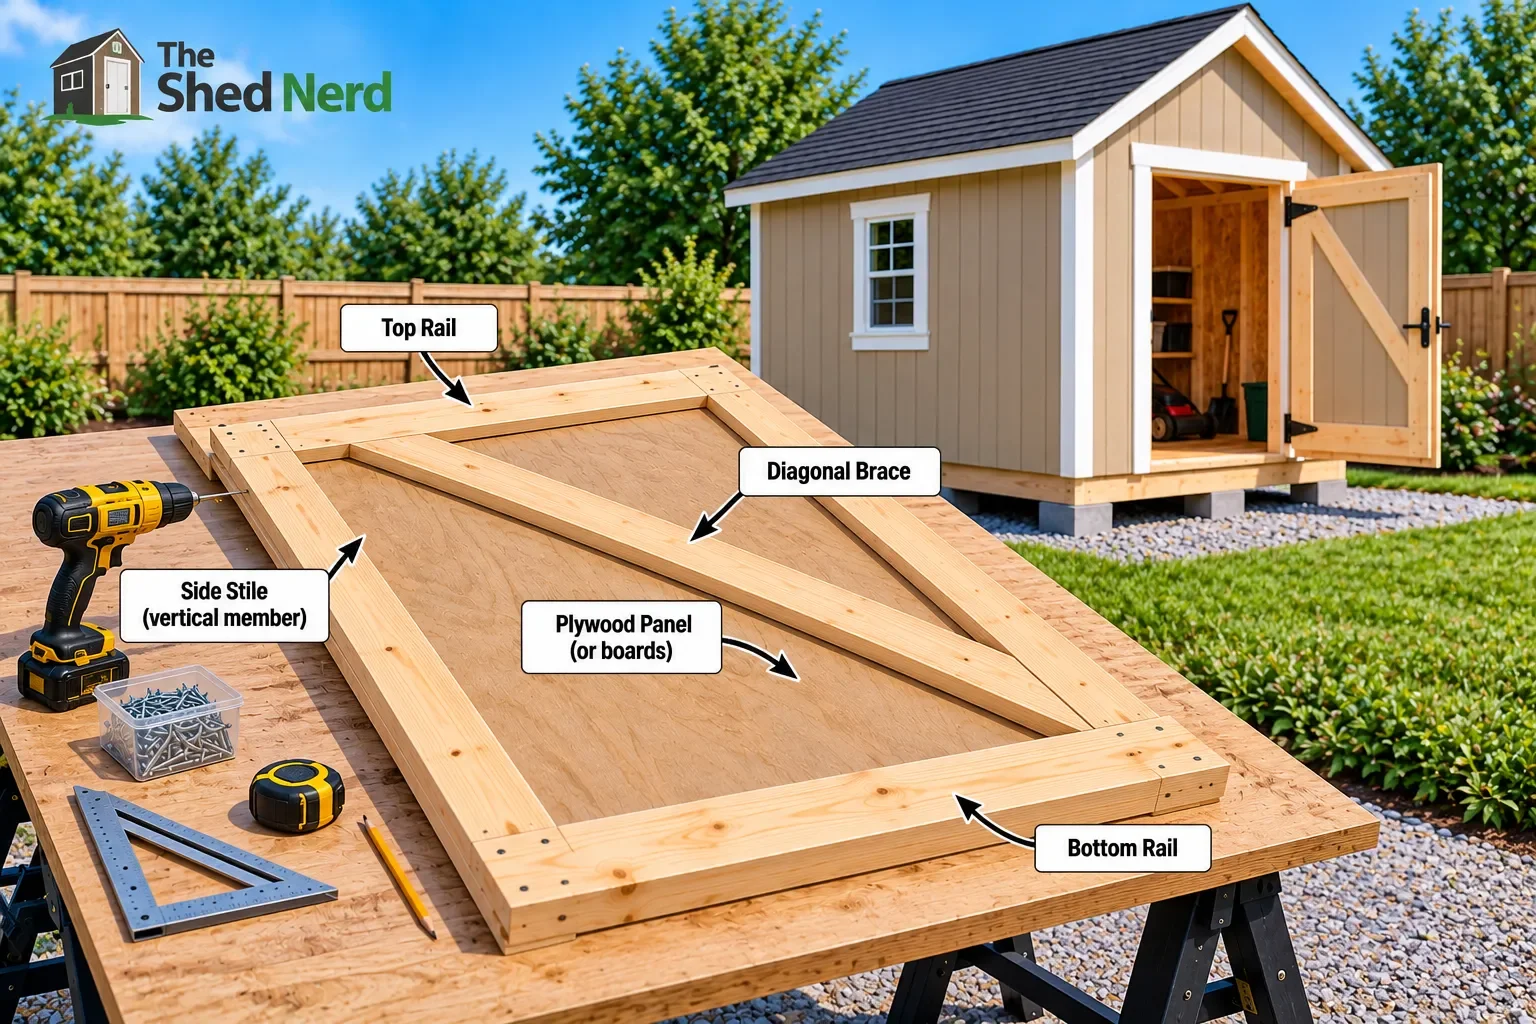
4. Build the Door Frame
For a framed wooden shed door, start by building the timber frame on a flat, level surface.
The frame normally consists of:
two vertical side members
a top rail
a bottom rail
one or more intermediate supports if required
Lay the pieces out and check the overall dimensions before fastening them together.
The frame needs to remain square.
One simple way to check this is to measure diagonally from corner to corner in both directions.
If the two diagonal measurements are the same, the frame is square.
This is the same principle we used when building the shed floor frame: check the diagonals rather than relying only on the outside measurements.
Our guide to
How to Build a Shed Floor Frame explains the same squaring technique in more detail.
5. Add the Door Bracing
Bracing helps keep a timber door from sagging out of square over time.
For a traditional ledged-and-braced door, horizontal ledges are fitted across the back of the door and diagonal bracing is used to help resist movement.
The exact bracing arrangement depends on the door design.
A common principle is to position the diagonal brace so it transfers the load toward the hinge side rather than allowing the free corner of the door to drop.
Don't simply add random pieces of timber to a door because they look strong.
The brace needs to work with the door frame and the hinge locations.
For larger or heavier doors, follow the design and hardware requirements specified by the plans.
6. Attach the Door Panel
If your door uses plywood or another sheet material, position the panel over the completed frame.
Before fastening it, check that:
the panel edges align with the frame
the door remains square
the panel doesn't interfere with the opening
the exterior face is oriented correctly
Use an exterior-suitable panel material appropriate for the project.
Fasten the panel according to the material and door design.
Don't rely on adhesive alone for a structural door assembly unless the product and plans specifically call for it.
For a board-built door, install the boards according to the planned layout and allow for the movement characteristics of the material.
7. Check the Door for Square
Before installing hinges, check the completed door again.
Measure both diagonals.
If the diagonals aren't equal, adjust the frame before continuing.
Also place the door against the opening and check:
top clearance
side clearance
bottom clearance
hinge-side alignment
latch-side alignment
This is much easier to correct while the door is still on the workbench.
Once the door is hanging, correcting a badly constructed or badly sized frame becomes considerably more difficult.
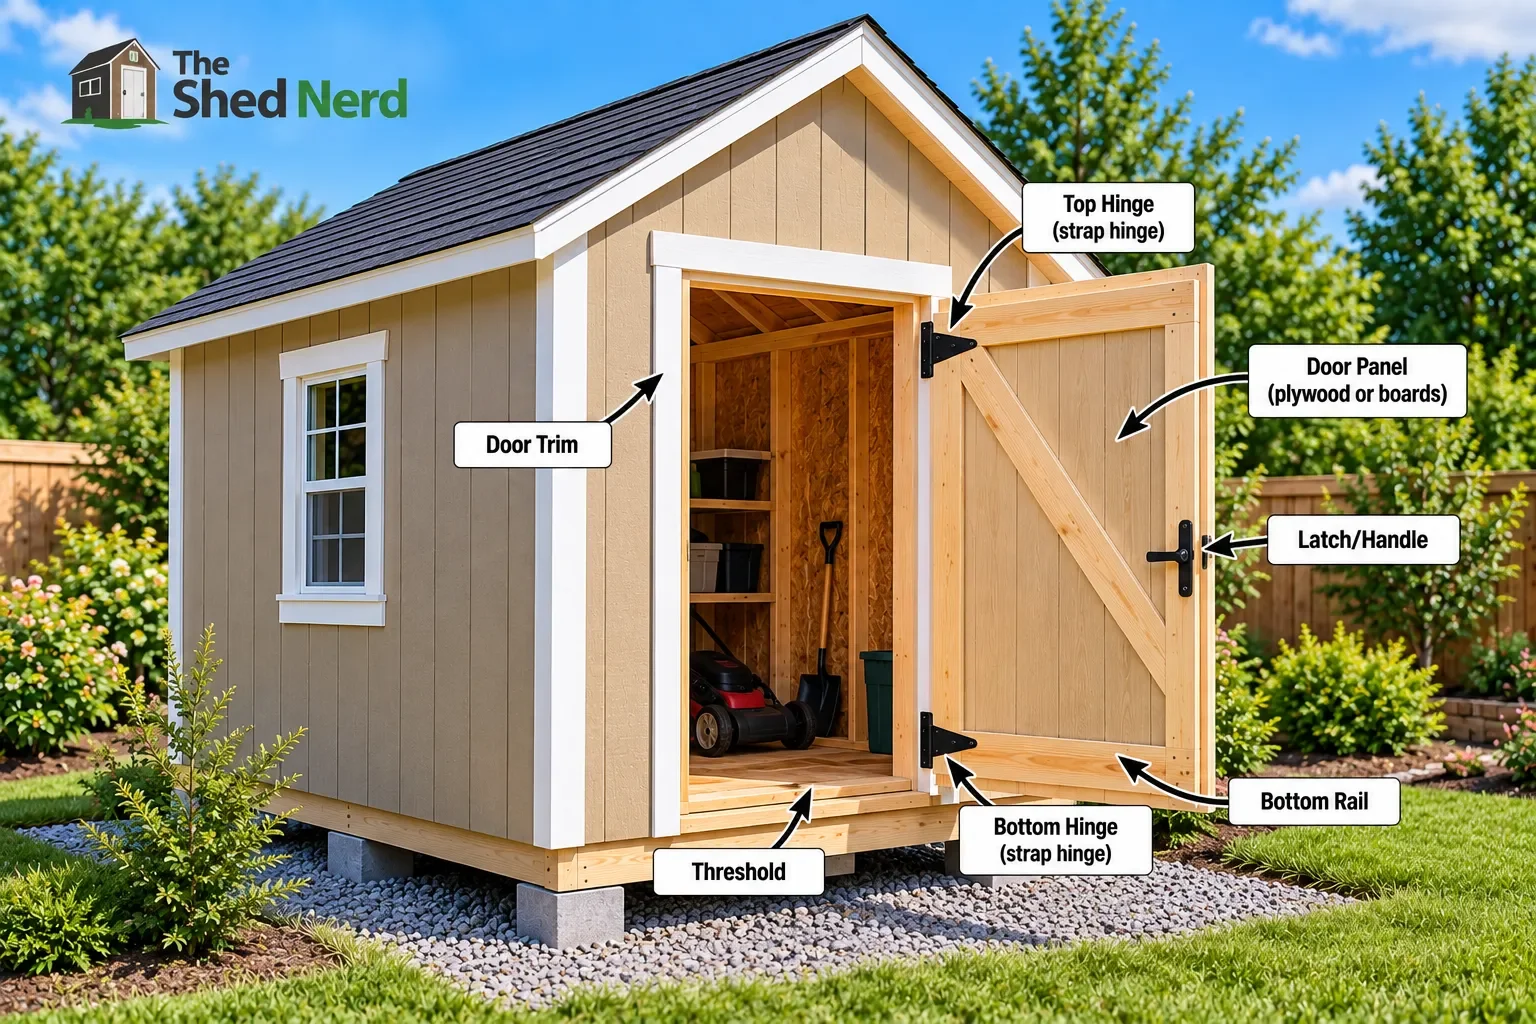
8. Install the Hinges
Choose hinges that are appropriate for the weight and size of the door.
Common shed-door choices include:
strap hinges
T-hinges
heavy-duty butt hinges
other exterior-rated hinges designed for the door system
Position the hinges according to the door design and manufacturer's instructions.
For a basic timber shed door, hinges are commonly positioned near the top and bottom of the door, with additional support used where the door size or weight requires it.
The hinge-side edge of the door needs to remain properly aligned with the jamb.
When installing the screws, make sure they have adequate purchase in the structural framing rather than relying only on thin siding or trim.
9. Hang the Door
With the hinges attached, position the door in the opening and secure the hinges to the shed's door framing.
This is much easier with a second person supporting the door.
Check the door as you tighten the fasteners.
You want the door to:
hang straight
open freely
close without binding
maintain a consistent gap
sit correctly against the stop or trim
Don't fully tighten everything immediately if the door still needs adjustment.
Work progressively until the door is correctly positioned.
10. Install the Door Latch and Hardware
Once the door is hanging correctly, install the latch or locking hardware.
Depending on the design, this might include:
latch
hasp
padlock hardware
handle
lockset
slide bolt
door stop
For double doors, one door may use a slide bolt to secure it to the threshold and header while the other door provides the main opening and closing action.
Hardware should be attached to solid framing wherever possible.
Follow the manufacturer's instructions for any lockset or specialized hardware.
11. Add Door Stops and Weather Protection
A door stop helps control the closed position of the door and prevents it from swinging too far into the shed.
Depending on the design, the stop may be incorporated into the jamb or added separately.
Weather protection is also important.
Check the gap around the closed door and consider appropriate:
weatherstripping
door seals
threshold details
exterior-grade sealant
The goal isn't necessarily to make a basic garden shed completely airtight.
Instead, the door should close properly while limiting unnecessary water and air entry.
12. Trim Around the Door
Once the door operates correctly, install the exterior trim.
Trim can:
cover the edges of the opening
create a finished appearance
protect exposed framing
provide a surface for weather sealing
help define the door opening
Make sure the trim doesn't interfere with the door's movement.
Our How to Install Shed Siding guide covers the siding and exterior trim considerations around openings.
13. Seal and Protect the Door
Wood doors need protection from weather exposure.
Before applying paint, stain or another finish, inspect the door for:
exposed end grain
unfinished edges
gaps
cracks
damaged surfaces
exposed fasteners where appropriate
Use a finish suitable for exterior wood and follow the product manufacturer's preparation and application instructions.
Pay particular attention to the bottom and edges of the door because these areas can receive significant moisture exposure.
A good finish won't prevent every movement caused by weather, but proper preparation and maintenance can help extend the life of the door.
14. Test the Finished Door
Before calling the job complete, open and close the door several times.
Check that:
the door opens freely
it doesn't drag on the floor
the latch engages correctly
the hinges remain secure
the gaps are reasonably consistent
the trim doesn't interfere
the door closes against the stop
water isn't able to easily enter around obvious gaps
If the door sticks, don't simply force it closed.
Find the source of the problem first.
A small adjustment to the hinges, latch, trim or door position may solve the issue.
Common Shed Door Building Mistakes
Building the door before measuring the actual opening
Always measure the finished opening rather than relying on the nominal shed dimensions.
Not checking the door for square
A door can look square while still being out of alignment. Check both diagonals.
Making the door too tight
Wood can move with changes in moisture, so a door needs appropriate clearance.
Using undersized hinges
A heavy timber door needs hardware capable of supporting its weight.
Attaching hinges only to siding
Hinges should be secured to suitable structural framing.
Forgetting door bracing
A poorly braced wooden door can sag and become difficult to close.
Leaving exposed wood unprotected
Pay attention to exposed edges and end grain when applying the exterior finish.
Installing the hardware before adjusting the door
Get the door hanging and operating correctly first, then install and adjust the latch and other hardware.
How to Build a Double Shed Door
If your shed has a wide opening, two smaller door leaves can be easier to handle than one very large door.
The basic process is similar:
Measure the opening.
Determine the size of each door.
Build each door frame.
Check both doors for square.
Add appropriate bracing.
Attach the exterior panels.
Install hinges.
Hang the doors.
Install the meeting stop or overlap.
Add the latch and slide bolt.
Check that both doors open and close correctly.
The two doors need to work together, so take particular care with the centre meeting point.
Shed Door Maintenance
A shed door is exposed to weather every day, so occasional maintenance can prevent small problems from becoming major ones.
Check the door periodically for:
loose hinge screws
sagging
damaged finish
swelling
cracked boards
rusting hardware
deteriorated weather seals
If the door starts sticking, find out why before trimming or cutting the door.
Seasonal changes in moisture can cause wooden components to move, and sometimes a hinge adjustment or finish repair is all that's needed.
What's Next?
With the shed walls sided and the door built and installed, the next stage is the other major opening in the building.
In the next part of the Shed Building Guide: From Foundation to Finished Shed, we'll look at How to Install Shed Windows, including preparing the opening, positioning the window, flashing, sealing and installing exterior trim.
If you're working through the guide from the beginning, you can continue through
How to Build a Shed Foundation: 4 Options,
How to Build a Shed Floor Frame,
Final Thoughts
Building a shed door is a relatively small part of the overall project, but it needs to be built carefully because it is one of the most frequently used parts of the shed.
Start with the actual opening dimensions, choose a door design that suits the building, build the frame square, add appropriate bracing, install suitable hinges and hardware, and make sure the finished door has enough clearance to operate properly.
Take your time with the first measurements and the door frame. A square, properly supported door will make the final installation much easier.
Once the door is working correctly, you're ready to move on to the windows and continue toward a finished shed.
Ready to Choose Your Shed Plan?
Once you understand the main stages of shed construction, having a detailed plan can make the project easier to organise. Explore different shed sizes, styles and layouts to find a design that fits your project.