

Building a shed roof is one of the more important stages of shed construction. The roof needs to provide a strong frame for the roof covering while directing rain and other weather away from the building.
The exact construction will depend on the shed design, roof style, dimensions, roof pitch, local conditions and the plans being followed. Before cutting any lumber, check your shed plans and local building requirements so the roof framing matches the structure you are building.
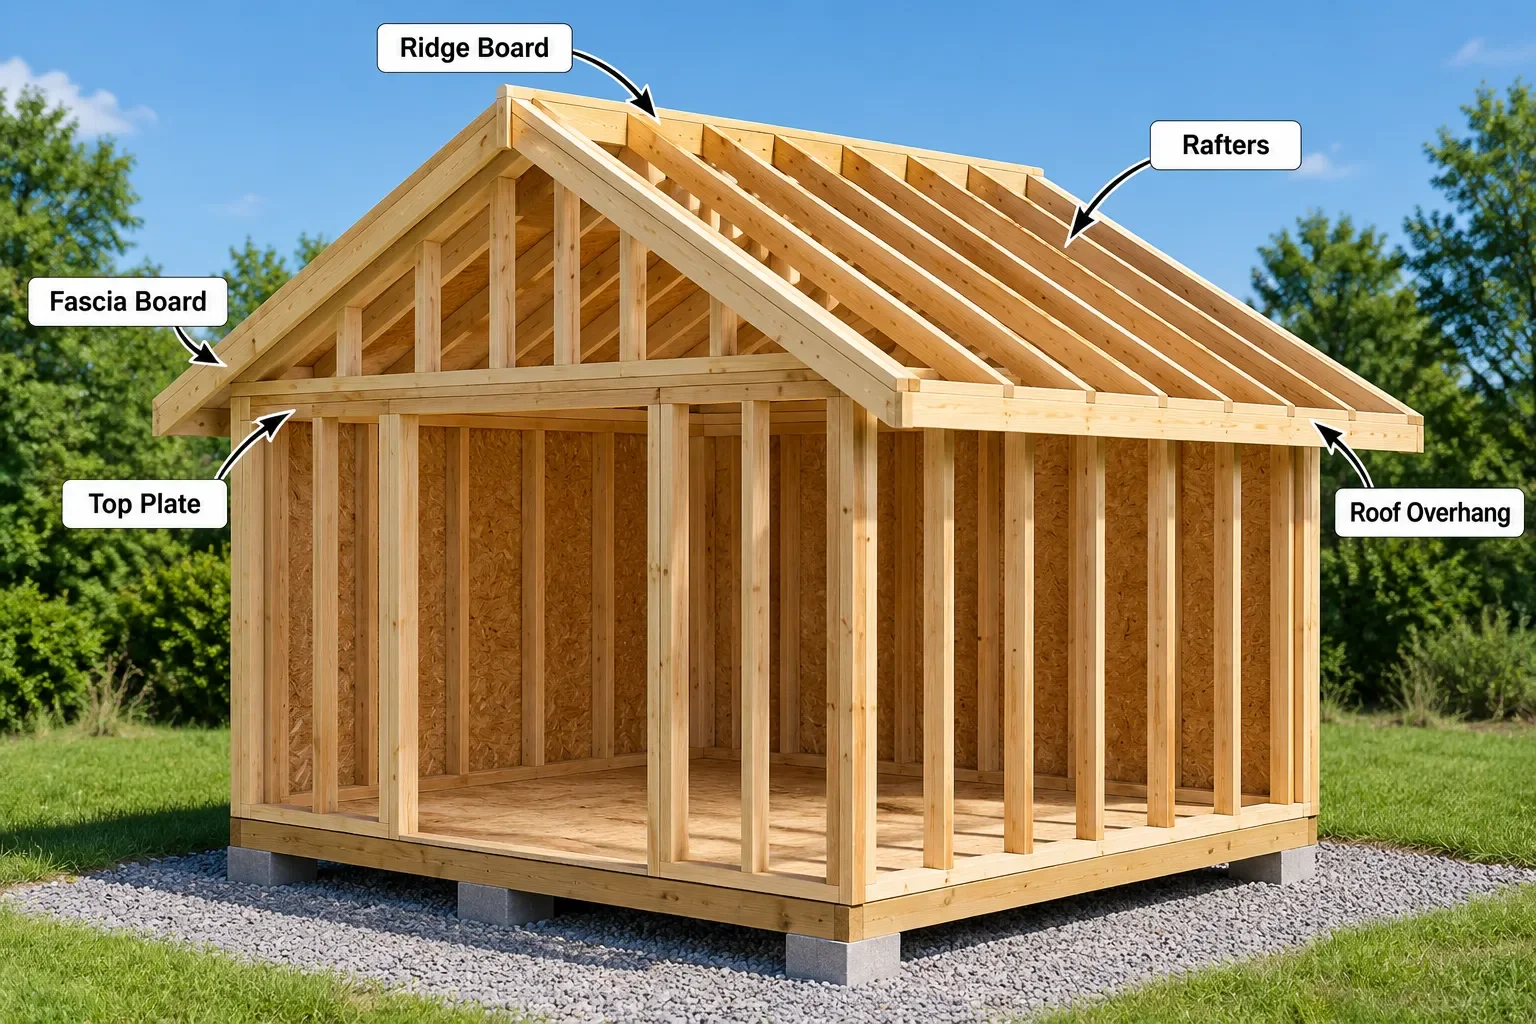
If you have already completed the walls, you're ready to move on to the next major stage of the Shed Building Guide: From Foundation to Finished Shed.
In this guide, we'll look at the main shed roof styles, how roof pitch affects the design, how rafters are laid out and installed, and how to prepare the roof for sheathing.
1. Choose Your Shed Roof Style
The roof style should be decided when you choose your shed plans because it affects the wall heights, framing, materials and overall appearance of the building.
Common shed roof styles include:
Gable roof
A gable roof has two sloping sides that meet at a central ridge. It is one of the most common shed roof designs and provides a straightforward roof structure with useful space above the ceiling.
Lean-to roof
A lean-to or shed-style roof slopes in one direction. It has a simple roof structure and can work particularly well for smaller sheds or buildings where a single-slope design is appropriate.
Gambrel roof
A gambrel roof has two slopes on each side, creating the familiar barn-style appearance. It can provide additional headroom and storage space but requires more complicated framing.
Hip roof
A hip roof slopes down on all four sides. It can create an attractive finished appearance, but the framing is more involved than a simple gable or lean-to roof.
The important point is to choose the roof design before construction begins rather than trying to change the roof structure after the walls are already built.
2. Understand Roof Pitch
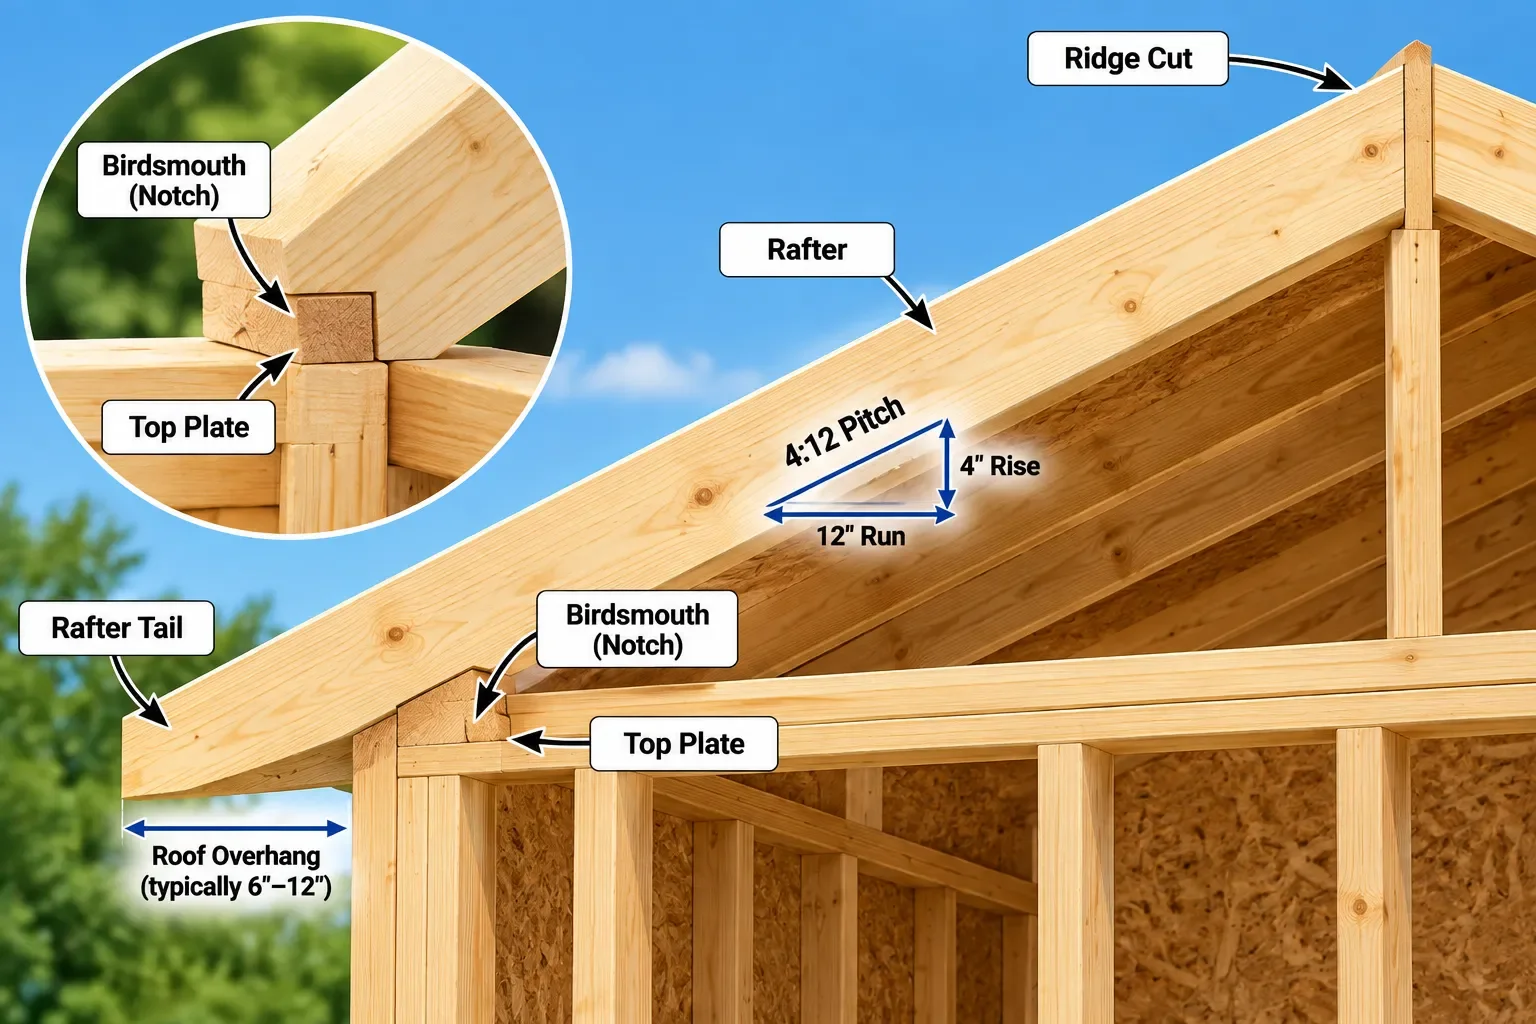
Roof pitch describes how much the roof rises for every 12 inches of horizontal run.
For example:
4:12 = 4 inches of rise for every 12 inches of run
6:12 = 6 inches of rise for every 12 inches of run
8:12 = 8 inches of rise for every 12 inches of run
The pitch affects the appearance of the shed, the length of the rafters and how quickly water and snow can move off the roof.
A steeper roof also changes how the roof is constructed, so the pitch shown on your shed plans should be followed rather than selecting a pitch after construction has started.
Roofing material matters too. Some roofing products are designed for lower slopes than others, so always check the manufacturer's installation requirements before selecting the final roof covering.
3. Check Your Shed Plans Before Cutting Rafters
This is one of the most important steps.
Don't assume that every shed uses the same rafter size, spacing or roof dimensions.
Your plans should establish things such as:
rafter size
rafter spacing
roof pitch
building span
roof overhang
ridge board or truss design
roof sheathing
collar ties or other framing
required connectors or fasteners
For example, a small shed may use 2×4 rafters while a larger structure or a building exposed to higher loads may require larger framing.
Rafter sizing and spacing should be based on the shed design, lumber specifications and applicable local requirements.
The Shed Nerd tip: Cut and test one rafter first. Once you know the template fits correctly, use it to mark the remaining rafters.
4. Prepare the Roof Framing Materials
Before starting, gather the materials and tools specified by your plans.
Depending on the design, the roof structure may require:
rafters
ridge board
collar ties
blocking
fascia boards
roof sheathing
structural screws or approved fasteners
framing square
tape measure
circular saw
drill/driver
level
ladder or appropriate roof-access equipment
Keep the lumber protected from unnecessary moisture and make sure the work area is clear before assembling the roof frame.
If you're estimating the quantities required for the overall shed, the
Shed Material Estimator Calculator can help with approximate material planning before you begin purchasing supplies.
5. Cut and Lay Out the Rafters
Rafters are the sloping structural members that support the roof sheathing and roofing system.
For a gable roof, the rafters run from the top plates of the walls up toward the ridge.
The first rafter should be treated as your template.
Mark:
The ridge or plumb cut
The birdsmouth
The seat cut
The tail
The required roof overhang
A birdsmouth is the notch that allows the rafter to sit securely on the wall's top plate.
Take your time with the first one.
A small error in the first rafter can be repeated across the entire roof if it is immediately used as the template.
Before cutting the remaining rafters, test the first one against the actual structure and confirm that the ridge, wall plate and overhang all line up with your plans.
6. Install the Ridge Board or Roof Trusses
A gable roof may use a ridge board with individual rafters or prefabricated/site-built roof trusses, depending on the design.
With a ridge-board system, opposing rafters meet at the ridge and are supported by the ridge board.
An alternative is to assemble pairs of rafters and a horizontal member on the ground to create roof trusses before lifting them into position. This can make installation easier, but larger assemblies may require more than one person to safely position them.
Whichever method your plans specify, check that the roof structure remains:
level
straight
square
correctly aligned with the walls
Do not continue installing rafters if the ridge is visibly out of alignment.
7. Install the Rafters
Install the rafters according to the spacing shown on your plans.
For a typical gable roof, opposing rafters are installed as pairs on either side of the ridge.
Pay particular attention to the ends of the building and make sure the rafters are correctly positioned before filling in the remaining spaces.
The roof framing also needs a clear load path through the building. Where appropriate, rafters should align with supporting wall framing so loads can be transferred through the structure rather than relying on unsupported sections of wall.
As you work, repeatedly check:
Rafter → wall plate → wall framing → floor → foundation
The entire structure should work together.
8. Add Collar Ties, Blocking or Other Required Framing
Some roof designs require additional framing to keep the roof structure stable.
Depending on the plans, this could include:
collar ties
rafter ties
blocking
braces
structural connectors
These components should not be added randomly or substituted for one another.
For example, a collar tie and a rafter tie perform different structural functions and are installed in different locations.
Follow the framing details in your shed plans and local requirements.
9. Check the Roof Frame Before Sheathing
Before covering the roof, stop and inspect the entire frame.
Check that:
the ridge is straight
rafters are correctly spaced
rafters are properly seated
the roof overhang is consistent
both sides of a gable roof are symmetrical
the walls remain plumb
the roof structure is securely connected
required blocking and connectors are installed
This is much easier to correct before the plywood goes on.
It is also a good time to compare the finished framing against the drawings in your shed plans.
If something doesn't match, investigate it now rather than covering the framing and discovering the problem later.
10. Install the Roof Sheathing
Once the roof framing has been checked, the next stage is installing the roof sheathing.
Roof sheathing provides the solid surface that the roofing system will be installed over.
The thickness and type of sheathing should follow your plans and local requirements.
When installing panels:
follow the panel layout shown on the plans
keep panel edges properly supported
stagger joints where required
use the specified fasteners
maintain the required spacing
keep the roof edges aligned
Work carefully around roof edges and openings.
Roof work introduces additional fall hazards, so use appropriate access equipment and safe working practices rather than improvising from unstable ladders, platforms or materials.
11. Prepare the Roof for Roofing
With the sheathing installed, the roof structure is essentially complete.
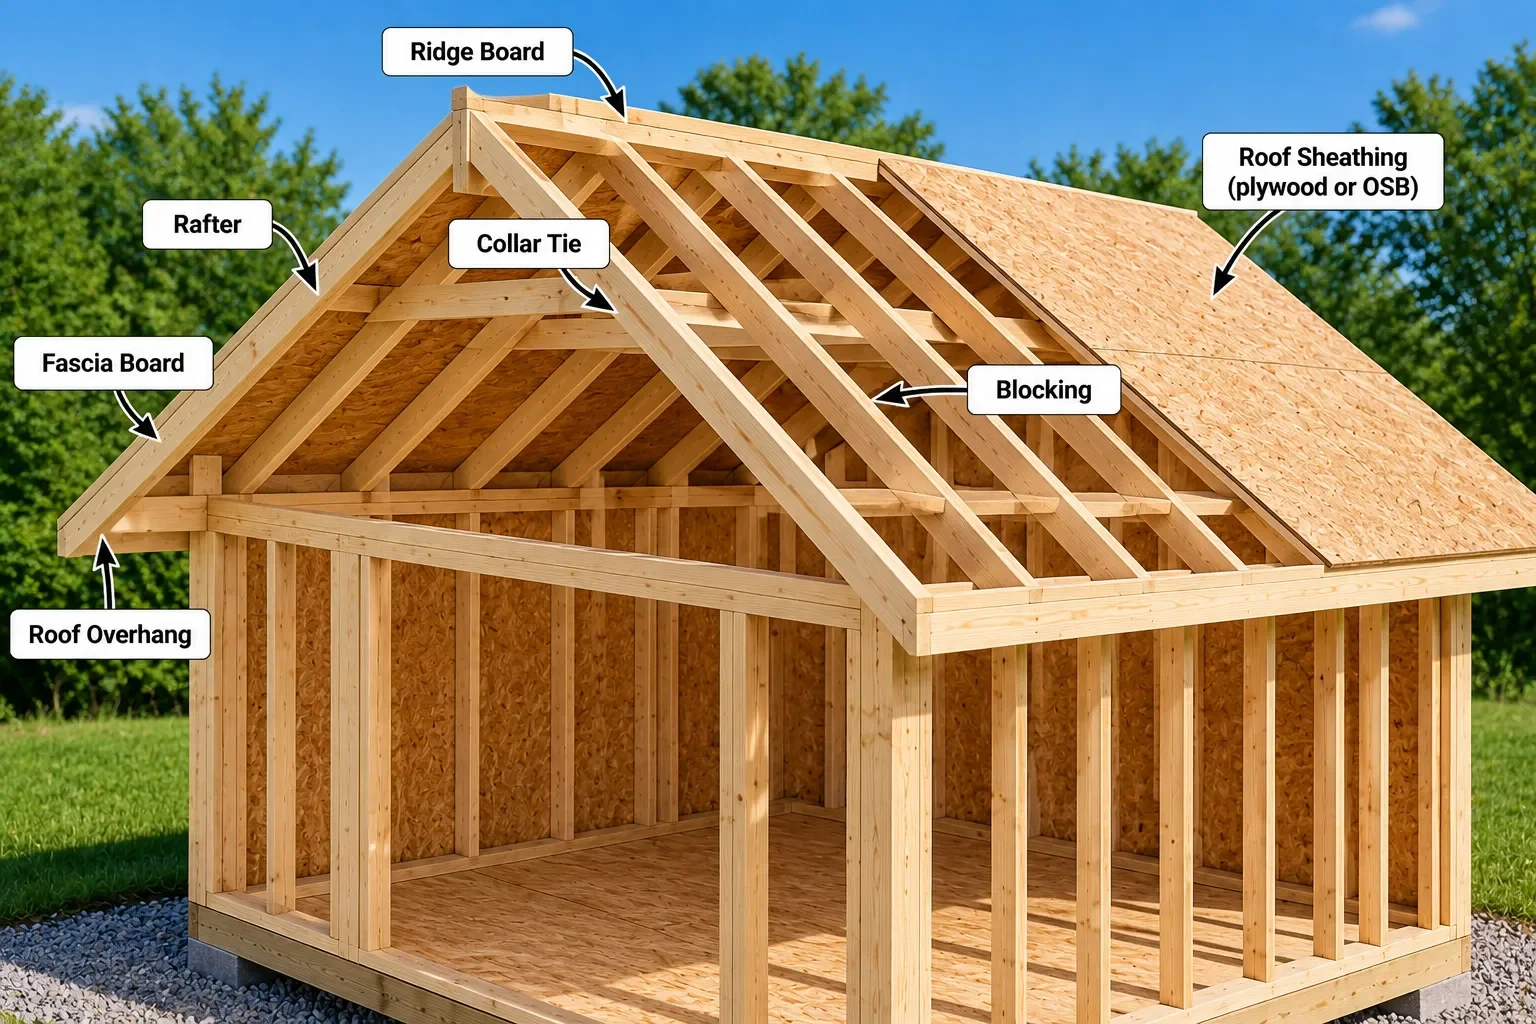
The next stage is the roofing system, which may include:
underlayment
drip edge
asphalt shingles
metal roofing
roll roofing
another roofing material appropriate for the roof design
The correct installation sequence depends on the roofing product being used.
That's why we're treating roofing as a separate part of this Shed Building Guide rather than trying to cover every roofing system in the roof-framing article.
Our upcoming guide, How to Install Shed Roofing, will cover that stage in more detail.
12. Don't Forget Roof Ventilation
Depending on the shed design and intended use, ventilation may need to be considered before the roof is finished.
Ventilation requirements vary with the building design, climate and intended use.
If the plans include roof or gable ventilation, make sure the required openings are incorporated before the roof is completely closed up.
This can be particularly important for sheds that will experience significant temperature or moisture changes.
Common Shed Roof Building Mistakes
A few mistakes can create problems later.
Cutting every rafter before testing one
Always make and test one rafter first.
Changing the roof pitch during construction
Changing the pitch affects rafter length, wall height, ridge height and roof materials.
Guessing rafter size
Rafter dimensions should come from the plans and applicable structural requirements.
Ignoring the overhang
The roof overhang affects both the appearance of the shed and how effectively the roof protects the walls.
Installing sheathing before checking the frame
Take the opportunity to inspect the framing while everything is still accessible.
Forgetting roof-to-wall connections
Roof uplift can be an important consideration, particularly in areas exposed to strong winds. Appropriate connectors and fastening requirements depend on the local building requirements and design.
What's Next?
Once the roof frame and sheathing are complete, the shed starts to look much more like a finished building.
The next stage is protecting and finishing the exterior.
In the next part of the Shed Building Guide: From Foundation to Finished Shed, we'll look at How to Install Shed Siding, including siding options, layout, cutting, fastening and finishing around doors and windows.
If you haven't already completed the earlier stages, start with our guide to how to build a shed foundation: 4 options, then continue through how to build a shed floor frame and how to frame shed walls before moving on to the roof.
And if you're planning the quantities for your project, the
Shed Material Estimator Calculator can help you create an approximate materials estimate before you start buying supplies.
Final Thoughts
Building a shed roof is much easier when you treat it as a planned sequence rather than simply cutting boards and putting them on top of the walls.
Start with the roof design and pitch, check your plans, build one accurate rafter template, install the framing carefully, inspect the structure and then move on to roof sheathing and the roofing system.
The most important thing is to build the roof according to the plans for your particular shed. Rafter dimensions, spacing, connections and roof requirements can vary considerably between buildings and locations.
Once the roof structure is complete, you're ready to move on to the exterior siding and continue working toward a finished shed.
Ready to Choose Your Shed Plan?
Once you understand the main stages of shed construction, having a detailed plan can make the project much easier to organise. Explore different shed sizes, styles and layouts to find a design that fits your project.