

Once the shed walls and roof structure are complete, installing the siding is the stage where the building starts to look like a finished shed.
Siding does more than change the appearance of the building. Properly installed exterior siding helps protect the wall structure from weather while creating the finished exterior surface.
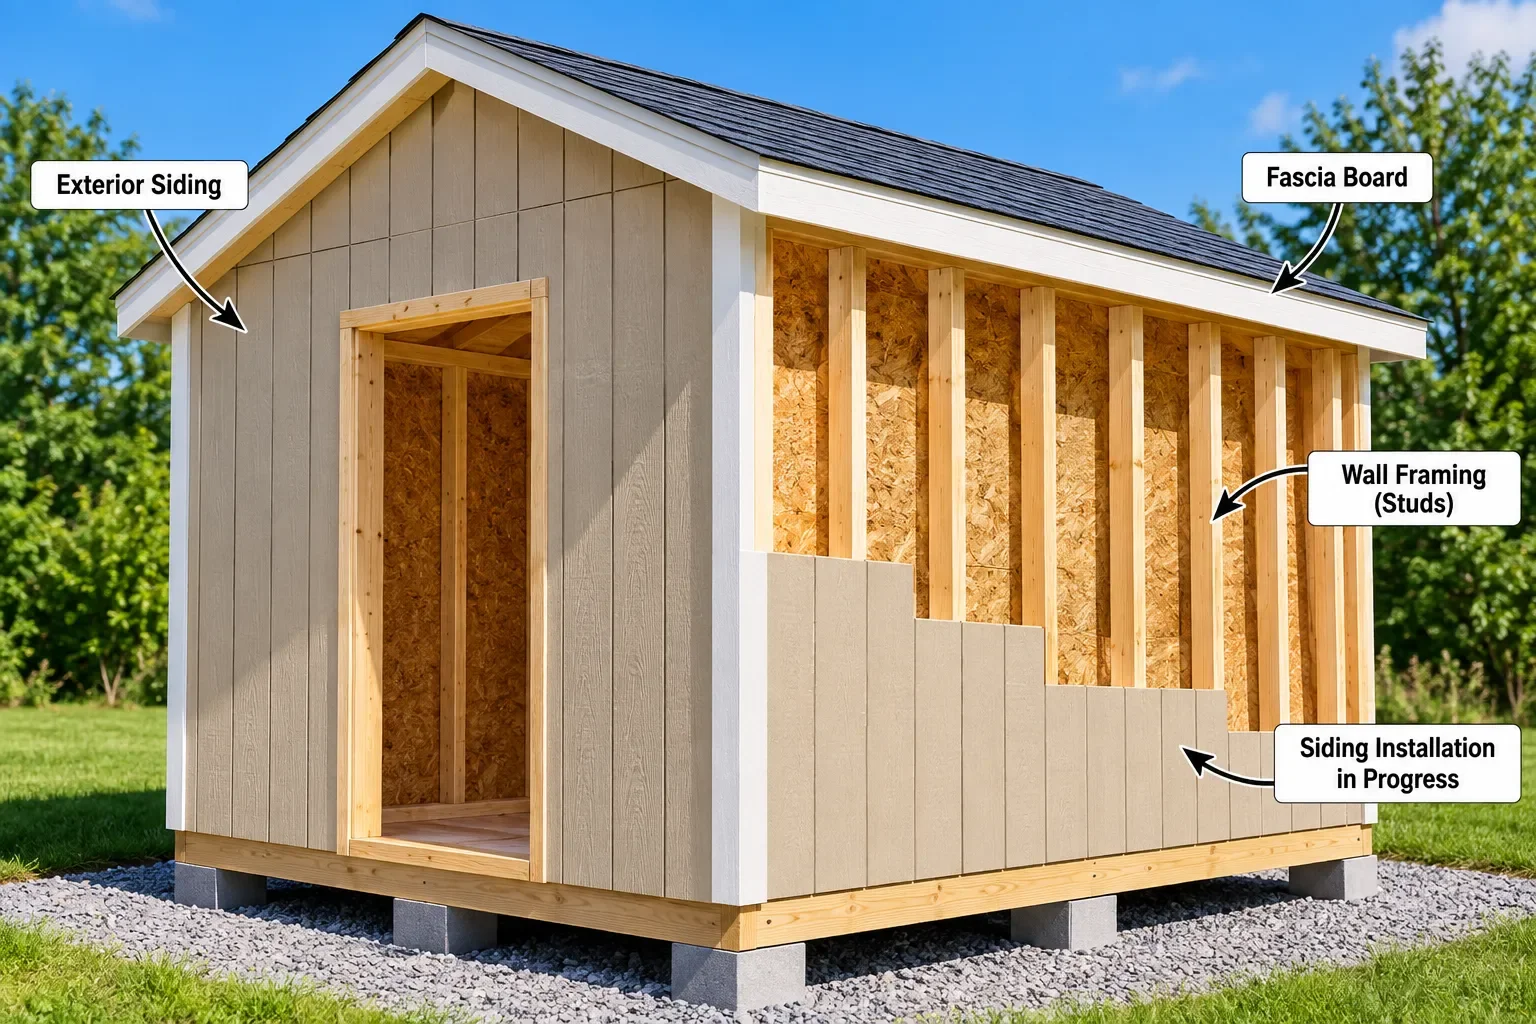
There are several ways to side a shed, including plywood panels, wood boards, engineered wood siding and other exterior siding products. The correct installation method depends on the product you choose, so always follow the manufacturer's instructions for the siding being installed. Current wood-siding guidance also emphasizes moisture management, flashing, accurate layout and corrosion-resistant fasteners.
If you've completed the roof framing, you're ready for the next stage of the
Shed Building Guide: From Foundation to Finished Shed
1. Choose the Right Shed Siding
The first decision is choosing the siding material.
Common shed siding options include:
Plywood or T1-11 siding
Plywood siding panels are popular for sheds because large sheets can cover a wall quickly. T1-11 is a common grooved plywood siding style and can provide both the wall covering and finished exterior appearance in one product.
Wood board siding
Individual wood boards can create several different looks, including traditional horizontal siding and board-and-batten styles.
Engineered wood siding
Engineered wood products are available as panels and lap siding. Products such as LP SmartSide are specifically marketed for shed applications and are available in different profiles and finishes.
Other siding materials
Depending on the project, builders may also use vinyl, fiber cement, metal or other exterior siding systems.
The important thing is to select a siding product that is suitable for exterior use and then follow its installation requirements.
2. Check the Shed Walls Before Installing Siding
Before the first siding panel goes up, inspect the walls.
The wall framing should be:
straight
level
plumb
properly braced
securely connected
ready to receive the siding
If the walls aren't straight now, siding won't correct the problem.
This is also the time to make sure the door and window openings match your shed plans.
Our guide to How to Frame Shed Walls covers wall plates, studs, door and window openings, assembling wall sections and raising the walls.
Take care of framing problems before installing the exterior covering.
3. Plan the Siding Layout
Good siding installation starts with good layout.
Measure each wall before cutting material.
Don't assume that opposite walls are exactly the same size. Small differences in framing can affect the amount of siding required.
Measure:
wall width
wall height
door openings
window openings
corners
gable sections
roof overhangs
If you're using panel siding, work out how the sheets will be positioned before cutting them.
For horizontal boards, determine the starting height and work out how the courses will finish near the top of the wall.
The goal is to avoid ending up with a very narrow or awkward piece of siding at the top.
4. Prepare the Wall for Siding
The wall preparation required depends on the siding product and the shed design.
Some siding products are installed directly over wall framing, while others require structural sheathing or a weather-resistant barrier beneath them.
Don't assume that one siding system can be installed using the same method as another.
For example, current wood-siding guidance recommends using a weather-resistant barrier and appropriate flashing as part of the wall's moisture-management system.
If your siding manufacturer's instructions specify a particular sheathing, WRB, flashing or fastening method, follow those instructions.
This is one area where the siding manufacturer's installation guide takes priority over a generic shed-building article.
5. Install Flashing Around Openings
Doors and windows are areas where water can enter the wall assembly if they aren't detailed correctly.
Before installing siding around an opening, check the flashing requirements for your siding and window or door system.
Flashing is generally integrated with the wall's weather-resistant barrier so water is directed away from the wall rather than behind the siding.
Current installation guidance recommends paying particular attention to flashing around windows, doors and other penetrations.
Don't cover an opening with siding before you've completed the required weatherproofing details.
Our upcoming guides on How to Build a Shed Door and How to Install Shed Windows will cover those parts of the construction process in more detail.
6. Measure and Cut the First Piece
The first piece of siding is particularly important because it establishes the position of everything that follows.
For horizontal siding, the first course should be level.
Use a level and establish a reliable reference line before fastening the first piece.
For panel siding, position the first panel according to the layout shown in your plans or the manufacturer's instructions.
Measure twice before cutting.
A small error at the bottom of the wall can become much more noticeable as additional courses or panels are installed.
7. Install the Siding
Once the first piece is correctly positioned, continue installing the siding according to the product instructions.
For horizontal siding, work upward from the first course.
For vertical siding or panels, establish a straight starting line and work across the wall.
As you install each section:
keep the siding aligned
check that courses remain level
maintain the required overlaps
follow the manufacturer's fastening pattern
keep joints properly positioned
avoid forcing boards into place
check your measurements regularly
Horizontal siding typically overlaps so that water is directed down the exterior rather than behind the wall assembly.
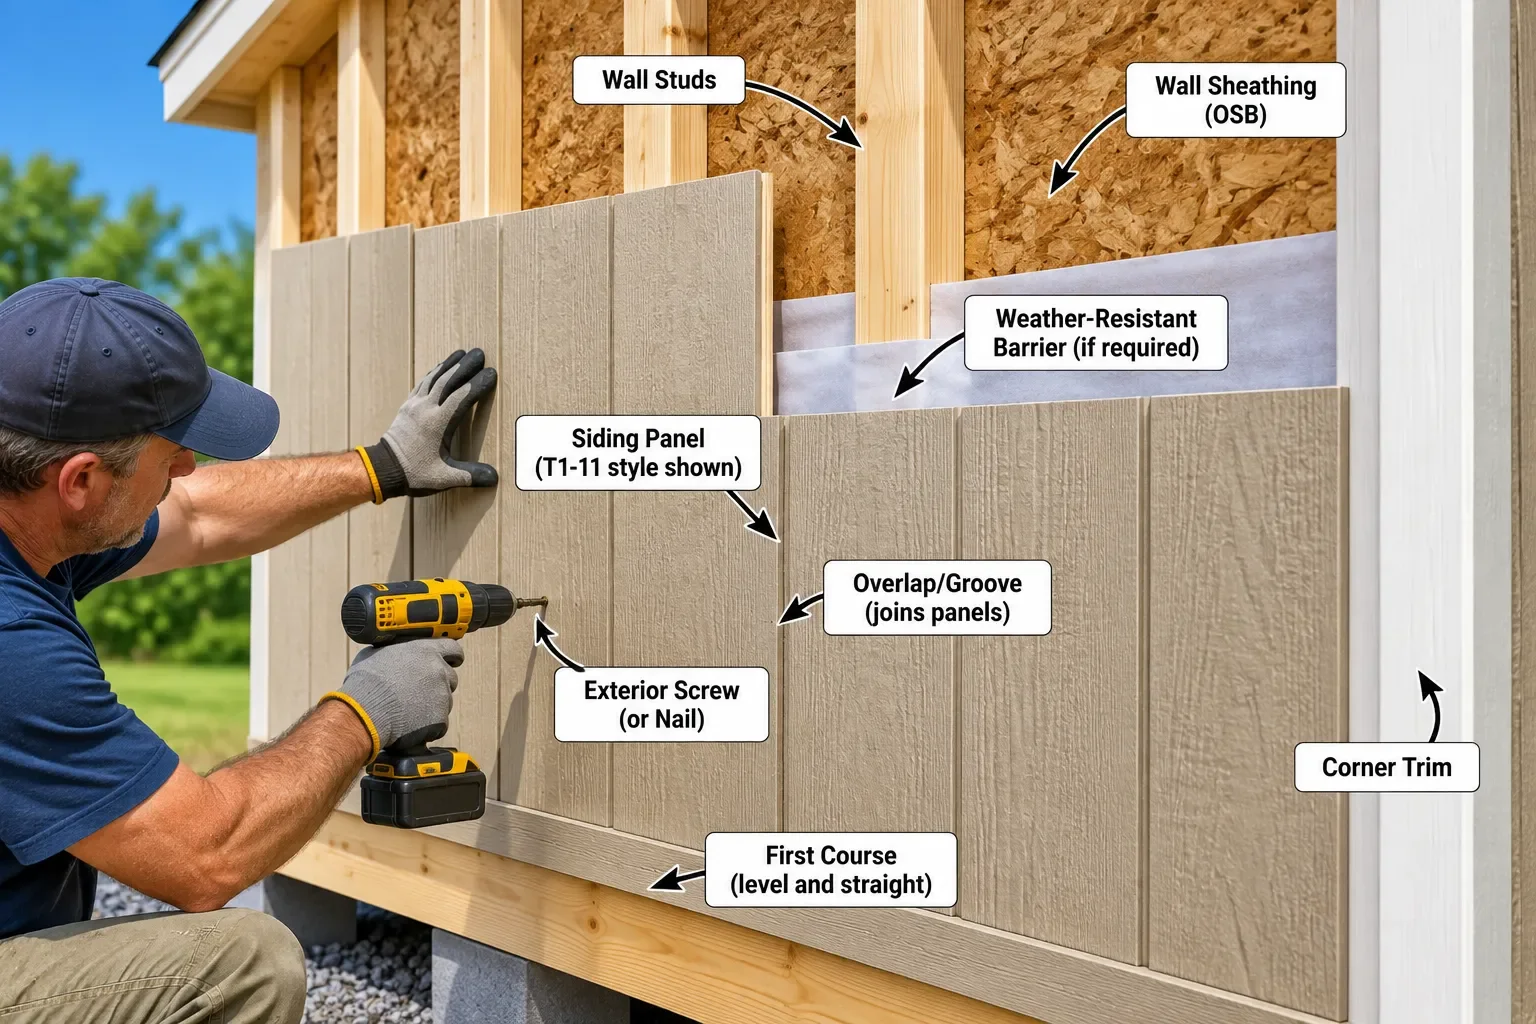
For plywood panel siding such as T1-11, the panels are commonly installed directly to the wall framing or appropriate sheathing according to the product design, with the panel edges arranged to manage water at the joints.
8. Fasten the Siding Correctly
The fasteners you use depend on the siding product.
Exterior siding generally requires corrosion-resistant fasteners, but the exact type, length, location and spacing should come from the manufacturer's installation instructions.
This is particularly important with engineered wood siding.
For example, LP SmartSide products have specific fastening requirements that vary according to the siding profile and installation method.
Don't simply choose a nail because it happens to fit the material.
Using the wrong fastener or fastening pattern can cause problems with movement, appearance, moisture protection or product warranty.
9. Work Around Doors and Windows
As the siding approaches a door or window opening, measure carefully and cut the material to fit the opening.
Avoid making large rough cuts and trying to hide them with trim.
Instead:
Measure the opening.
Transfer the measurements to the siding.
Mark the cut lines.
Check the orientation of the panel or board.
Make the cut.
Test-fit the piece.
Install the required trim and flashing according to the plans and product instructions.
The finished siding should meet the opening cleanly while leaving the required clearance for trim and weatherproofing.
We'll cover door and window construction separately later in the Shed Building Guide.
10. Install the Corner and Wall Trim
The corners of the shed need to be finished so the siding edges are protected and the building has a clean appearance.
Depending on the siding system, this may involve:
corner boards
trim boards
metal flashing
J-channel
manufacturer-specific corner pieces
The correct detail depends on the siding material.
For wood siding, trim can also provide a finished edge around doors, windows and corners.
Make sure the trim doesn't interfere with the required water-shedding details.
11. Finish the Gable Ends
If your shed has a gable roof, the siding will normally continue up into the triangular gable ends.
This requires careful measuring and cutting.
One approach is to use the roof slope and the plans to establish the required cuts before installing the panels.
For panel siding, make sure the panel is adequately supported and fastened according to the product requirements.
For board siding, maintain the same alignment and spacing used on the main walls.
The gable is one of the areas where small layout errors can become very visible, so take your time.
12. Seal and Protect the Siding
Once the siding is installed, inspect the entire exterior.
Look for:
exposed cut edges
gaps
damaged boards
incorrectly positioned fasteners
open joints
areas around doors and windows that need attention
places where water could enter behind the siding
Where the siding manufacturer recommends sealing exposed cut ends or joints, use the specified product.
For wood siding, exposed end grain deserves particular attention because it can absorb moisture.
Current wood-siding guidance recommends sealing exposed cut ends where required and using exterior-grade caulk around appropriate gaps and penetrations.
13. Paint or Finish the Siding
The final finish depends on the siding material.
Wood siding generally needs an appropriate exterior paint, stain or protective finish.
Some engineered siding products arrive pre-primed and are designed to receive an exterior coating according to the manufacturer's instructions.
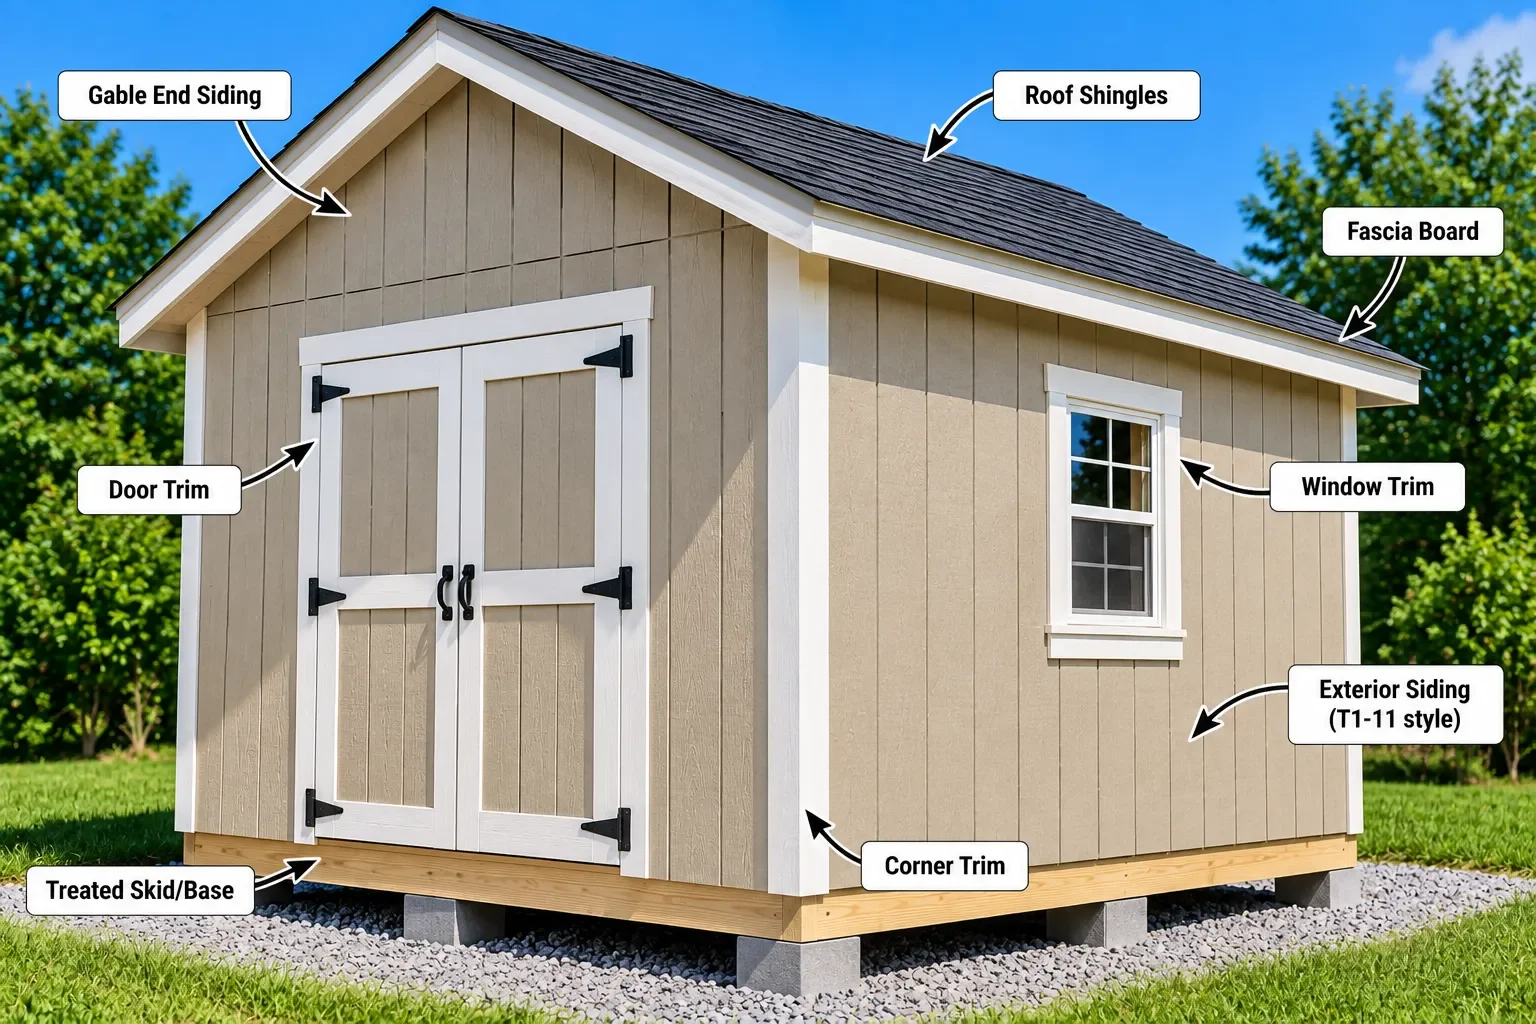
Before painting, make sure the siding is clean, dry and properly prepared.
Pay particular attention to:
exposed cut edges
joints
corners
trim
around doors and windows
A good finish isn't just about appearance. Proper coating and maintenance help protect exterior wood products from moisture and weather exposure.
Common Shed Siding Mistakes
Starting with an unlevel first course
If the first course is out of level, the error can become more noticeable as the siding continues upward.
Cutting siding before checking measurements
Measure each wall and opening rather than assuming dimensions from another wall.
Using the wrong fasteners
Siding products have different fastening requirements. Follow the manufacturer's instructions.
Ignoring moisture management
Siding is part of the exterior wall system. Flashing, weather-resistant barriers and properly detailed joints help manage water.
Forgetting exposed cut ends
Some siding products require exposed cuts to be sealed or primed.
Installing siding before checking the wall framing
Straight siding starts with straight walls.
Treating every siding product the same
T1-11, individual wood boards, engineered wood, vinyl and other siding systems can have very different installation requirements.
How Much Siding Do You Need?
The amount of siding required depends on the dimensions of the shed, the siding product and the size of doors and windows.
A basic estimate starts with the wall area:
Wall area = wall width × wall height
Then subtract the larger openings where appropriate.
For a gable wall, the triangular section above the main wall also needs to be included.
Finally, allow for cutting waste and follow the coverage information supplied with your siding product.
If you're planning the rest of the shed materials as well, the
Shed Material Estimator Calculator can help estimate quantities for common shed dimensions and framing configurations.
Remember that the calculator is a planning estimator, not an exact siding takeoff.
What's Next?
With the shed walls covered, the building is beginning to look like a finished structure.
The next stages will focus on the openings and exterior details.
In the next part of the Shed Building Guide: From Foundation to Finished Shed, we'll look at How to Build a Shed Door, including door framing, dimensions, construction and installation considerations.
If you haven't completed the earlier stages, you can work back through
How to Build a Shed Foundation: 4 Options
How to Build a Shed Floor Frame
Final Thoughts
Installing shed siding is a job where careful preparation makes a big difference.
Start with straight, properly framed walls. Choose siding that's suitable for exterior use, plan the layout before cutting, install the first course carefully and follow the manufacturer's requirements for fastening, flashing and finishing.
Take particular care around doors, windows, corners and exposed cut edges. These details are important for both the appearance of the finished shed and the way the exterior handles weather.
Once the siding is complete, you're ready to move on to the doors and windows and continue working toward a finished shed.
Ready to Choose Your Shed Plan?
Once you understand the main stages of shed construction, having a detailed plan can make the project easier to organise. Explore different shed sizes, styles and layouts to find a design that fits your project.