

How to Frame Shed Walls
Once the shed floor frame is complete, the next major stage is framing the walls. The wall frame provides the structure that supports the siding, doors, windows and roof, so accuracy at this stage matters.
A properly framed shed wall should be straight, level, plumb and square. Your specific shed plans should always determine the wall dimensions, stud sizes, spacing and opening locations because these can vary between designs.
Before you start, make sure the floor frame is securely supported and ready for wall construction.
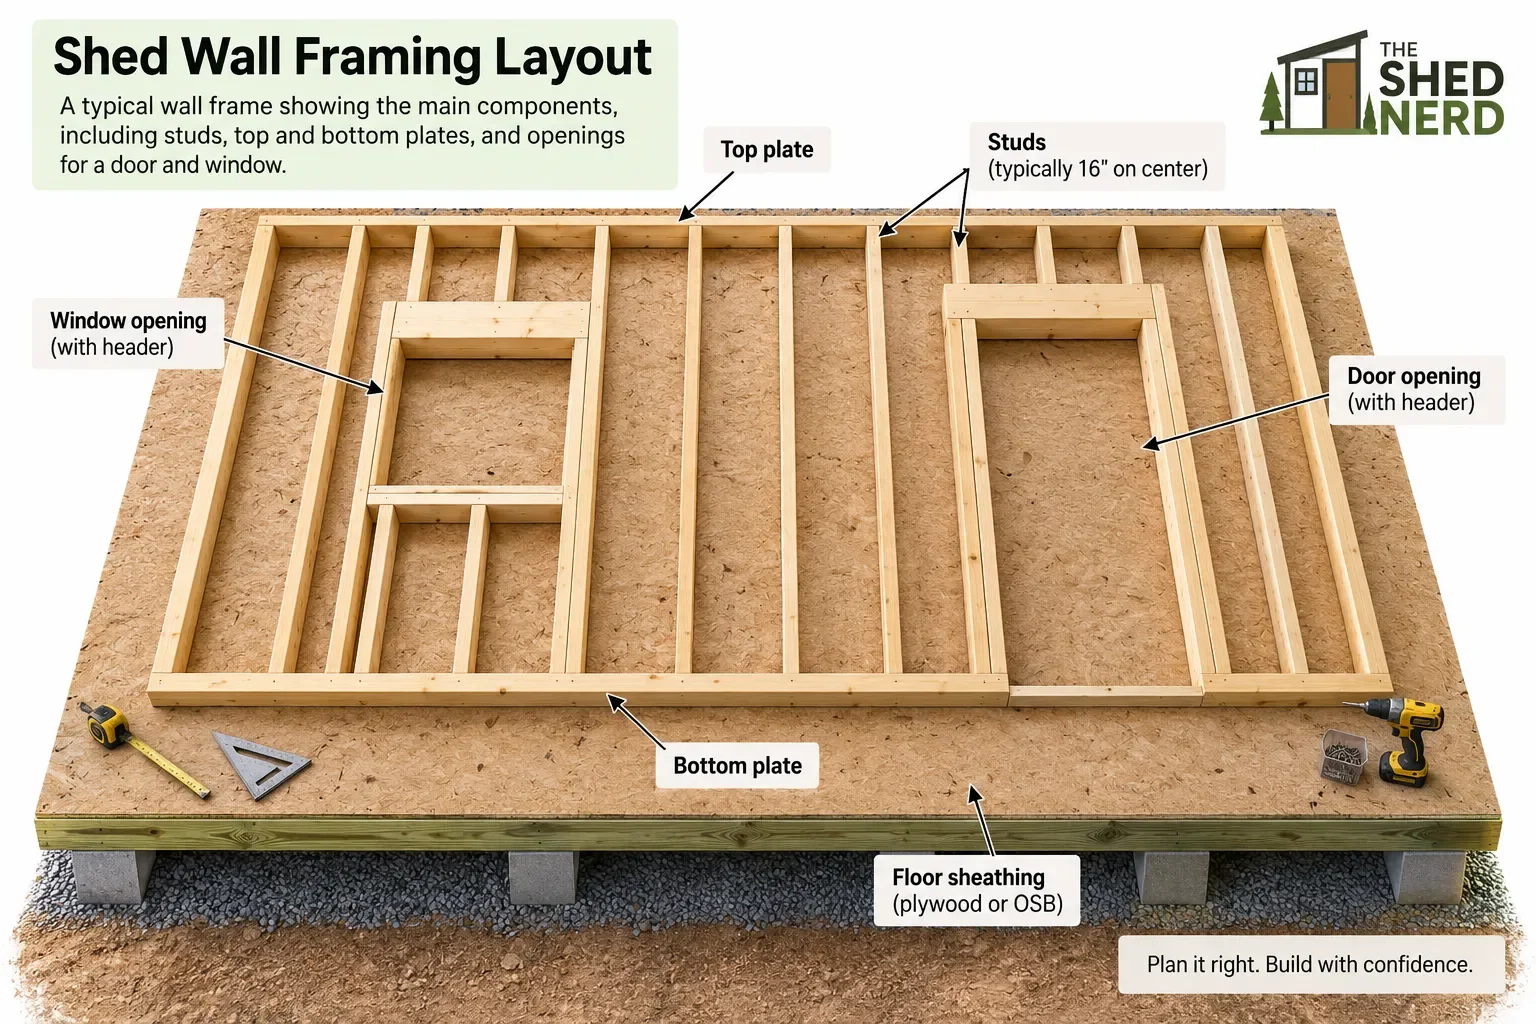
1. Check Your Shed Plans First
Before cutting any lumber, go back to your shed plans and identify:
Wall lengths and heights
Stud size and spacing
Door locations and dimensions
Window locations and dimensions
Header requirements
Wall sheathing
Corner details
Roof design and wall connection
This is also the time to check local building requirements that may affect framing, openings or structural details.
Before cutting any lumber, review your Shed Building Plans to identify the wall dimensions, stud spacing and door and window locations.
2. Gather Your Tools and Materials
The exact materials depend on your shed design, but common framing equipment includes:
Tape measure
Pencil
Carpenter's square
Chalk line
Level
Circular saw
Hammer or framing nailer
Framing lumber
Fasteners
Temporary bracing
Safety glasses
Choose straight, sound framing lumber wherever possible. Straight studs make it easier to assemble walls that remain flat and easier to sheath later.
3. Lay Out the Wall Plates
The wall plates form the horizontal top and bottom members of the wall frame.
Lay the bottom and top plates together on the shed floor and mark the stud positions according to your plans.
A common framing layout uses 16 inches on center, but don't automatically use that spacing on every shed. Follow the spacing specified by your plans and local requirements.
Mark the locations of doors and windows at this stage as well.
Good layout now saves time later.
4. Cut and Position the Wall Studs
The vertical studs connect the bottom and top plates and form the main framework of the wall.
Cut the studs to the required length and position them at the marks on your plates.
Before fastening them, check that:
The studs are positioned correctly
The wall dimensions match the plans
The studs are oriented consistently
Door and window openings are in the correct locations
For a simple wall without openings, this process is relatively straightforward.
Walls containing doors and windows require additional framing.
5. Frame Door and Window Openings
Openings need additional framing because removing studs creates a gap in the wall.
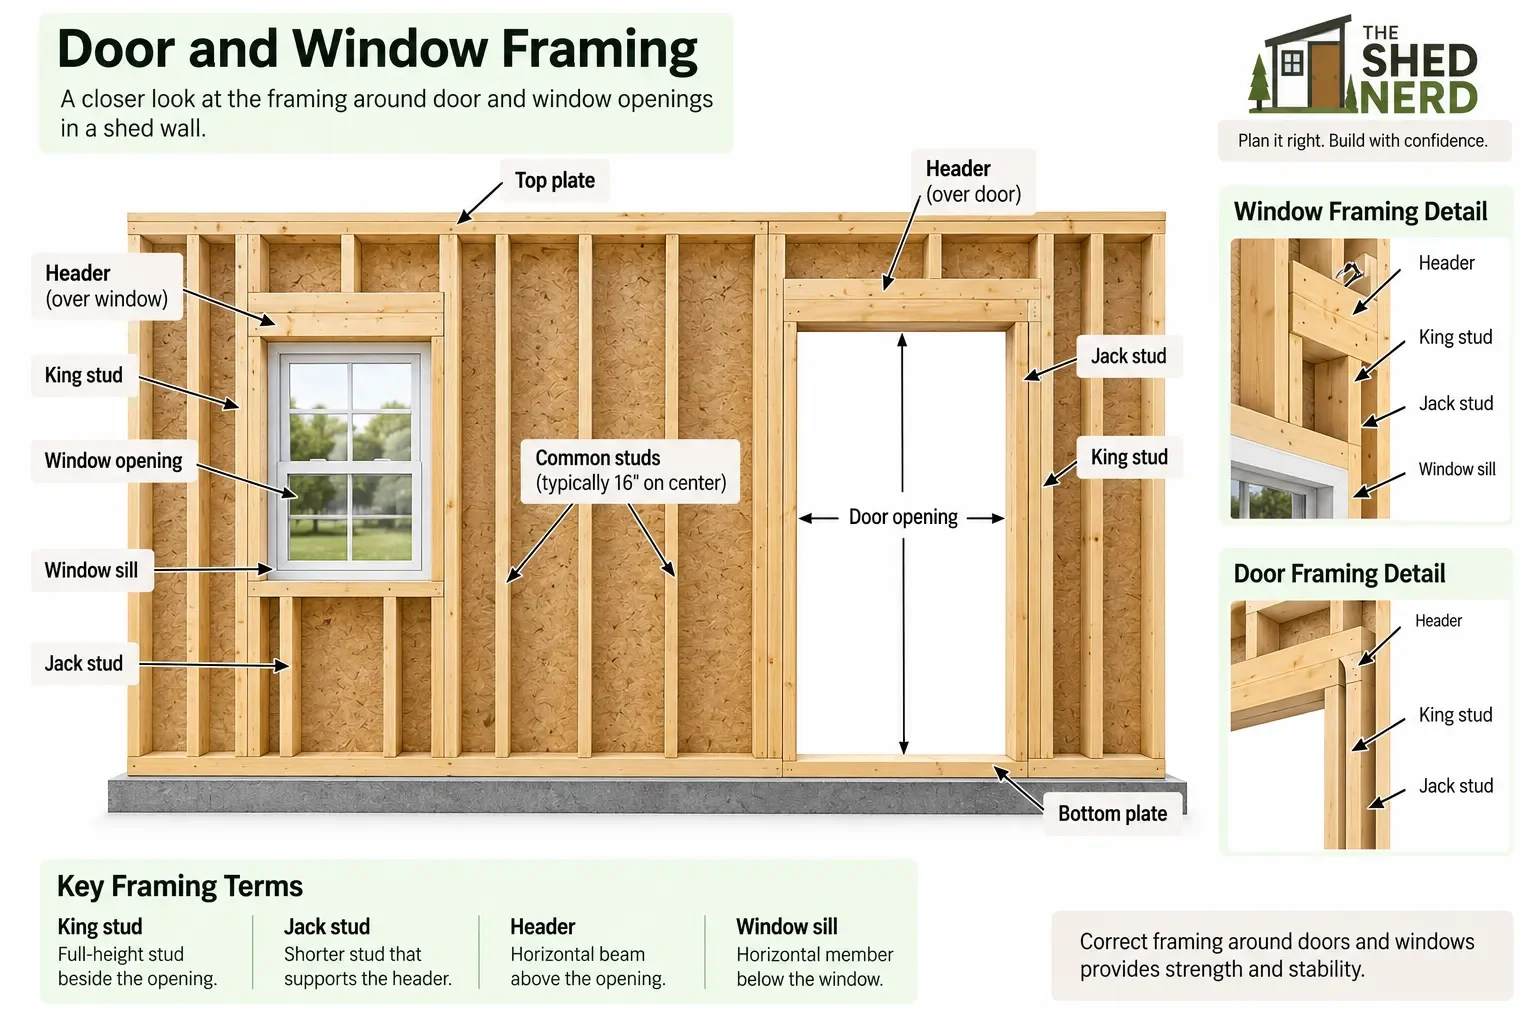
A typical framed opening can include:
King studs — full-height studs beside the opening
Jack studs — shorter studs supporting the header
Header — horizontal framing above the opening
Sill — horizontal framing beneath a window
The exact dimensions and construction of these components should come from your shed plans rather than being guessed. This Old House identifies these members as important parts of a properly framed shed wall.
This is particularly important for larger doors because the opening can affect the strength and stiffness of the wall.
6. Assemble the Wall Frame
Once the studs and openings have been laid out, assemble the wall frame on a flat surface.
Fasten the studs to the bottom plate first, followed by the top plate.
Check the wall as you work.
You want the completed frame to be:
Straight
Square
Correctly dimensioned
Properly aligned with the openings
For larger walls, having another person help with positioning and handling the frame can make the work considerably easier.
7. Square the Wall
Before raising the wall, check that the frame is square.
Measure diagonally from one corner to the opposite corner, then measure the other diagonal.
If the two measurements are equal, the rectangular wall frame is square.
If they differ, adjust the frame before proceeding.
This is one of those small checks that can save considerable trouble later when you install sheathing and connect the walls together.
8. Raise the Shed Walls
Raising a completed wall frame is much easier and safer with assistance.
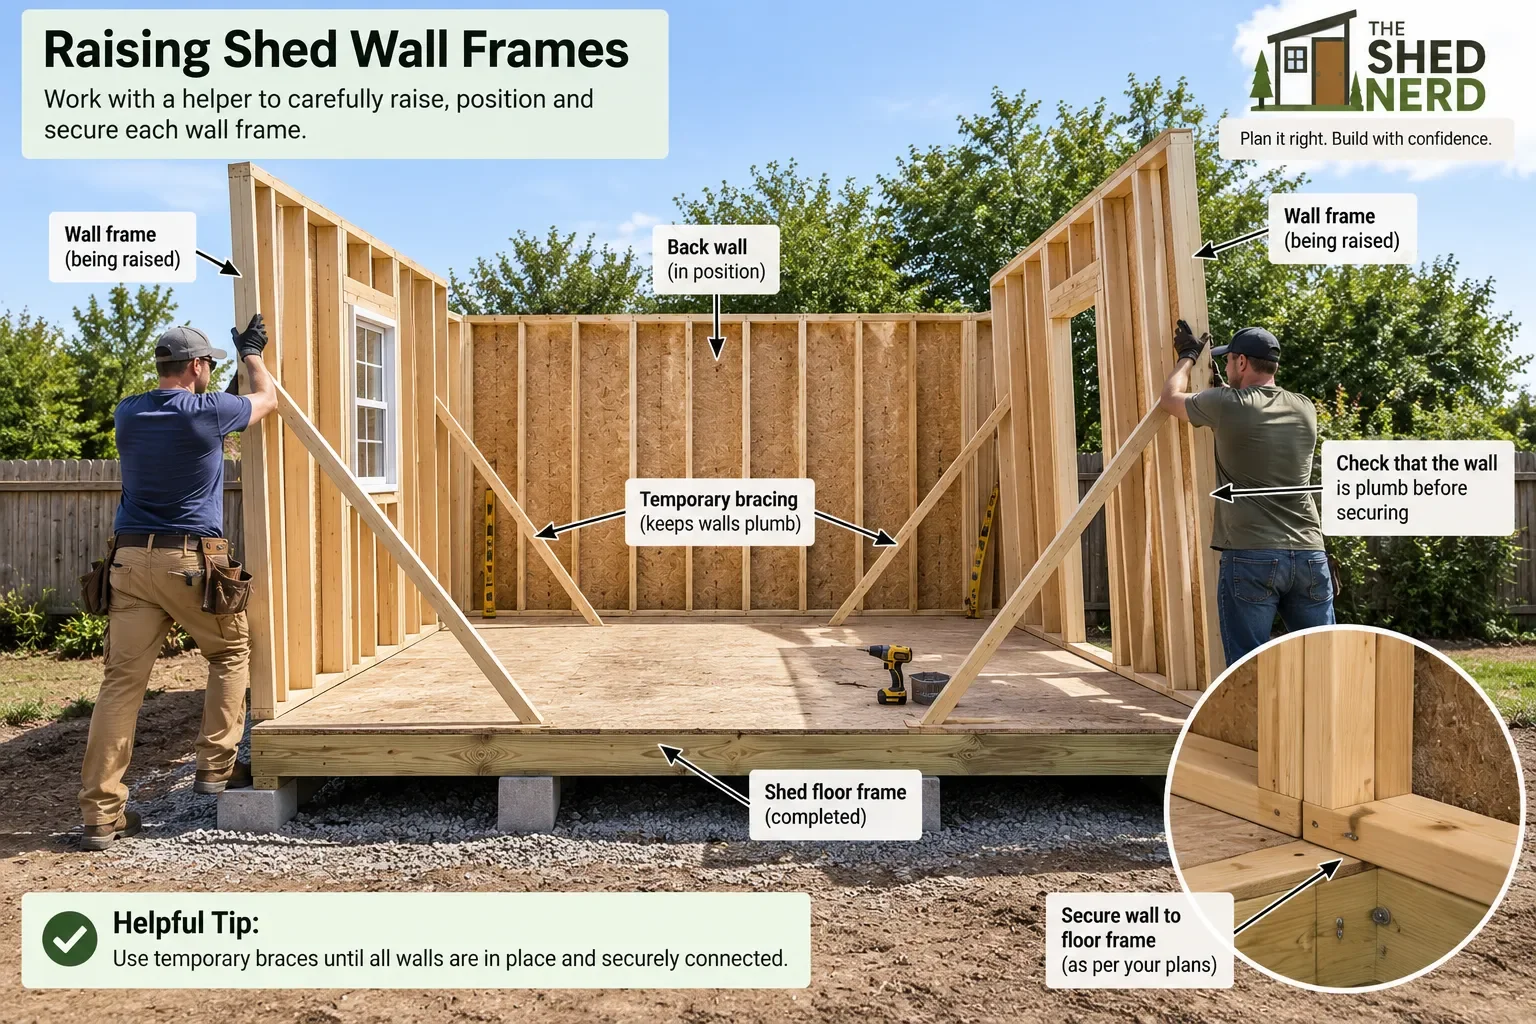
Position the wall on the floor frame according to the shed plans and carefully raise it into place.
Once standing:
Position the bottom plate correctly.
Check the wall's location.
Check that it is plumb.
Temporarily brace the wall.
Secure it to the floor structure as specified by the plans.
Check the wall again before moving on.
Do not remove temporary bracing simply because the wall is standing.
Keep the walls supported while the remaining wall sections are raised and connected. Current framing guidance also recommends assistance and temporary bracing when raising larger wall sections.
9. Connect the Wall Corners
Once the walls are standing, connect the corners so the individual wall sections become one structure.
Check each corner for:
Plumb
Square
Proper alignment
Secure fastening
The corner framing needs to provide a solid connection between adjoining walls and give you a suitable surface for attaching the wall sheathing and siding.
Once all four walls are connected, check the structure again before moving to the next stage.
10. Add Bracing and Wall Sheathing
Depending on the shed design, diagonal bracing or structural sheathing may help provide lateral stability.
Wall sheathing such as plywood or OSB can also form an important part of the wall assembly.
The exact sheathing type, thickness, fastening pattern and bracing requirements should come from your plans and applicable building requirements.
Don't assume that one sheathing or bracing method is suitable for every shed.
Check the Walls Before Moving On
Before you start framing the roof, take a final inspection of the wall structure.
Check:
Are the walls plumb?
Are the corners square?
Are the walls properly connected?
Are door openings the correct size?
Are window openings correctly positioned?
Are temporary braces still needed?
Does the top of the wall match the roof design?
Does everything match the shed plans?
Fixing a framing problem now is much easier than trying to correct it after the roof has been installed.
What's Next
With the shed walls standing, the next major stage is the roof.
The roof framing needs to work with the wall dimensions, roof pitch and overall shed design. Your plans should show the required rafters or trusses, roof sheathing and other structural details.
Framing shed walls is one of the most important stages between the floor and the finished building.
Make sure the floor frame is level and square before beginning wall construction by following our guide to How to Build a Shed Floor Frame.
Take your time with the layout, follow your plans, check your measurements and repeatedly verify that the walls are straight, plumb and square.
A little extra care during wall framing makes the following stages — roofing, siding, doors and windows — much easier.
A properly prepared foundation is the starting point for the entire structure, so review How to Build a Shed Foundation: 4 Options if you haven't completed that stage yet.