

How to Build a Shed Floor Frame
A strong, level floor frame is one of the most important parts of a shed.
The floor supports the walls, roof and everything you plan to store inside the building. If the frame is out of square or not properly supported, problems can appear later when you're trying to install the walls, doors and roof.
The good news is that a shed floor frame is a straightforward project when you work from a good set of plans and take the time to measure, level and square each stage.
This guide walks through the main steps involved in building a typical wood shed floor frame.
Important: The exact lumber sizes, joist spacing, fasteners and foundation requirements should always follow your shed plans, local building requirements and site conditions. The examples in this guide describe common construction methods rather than an engineered design.
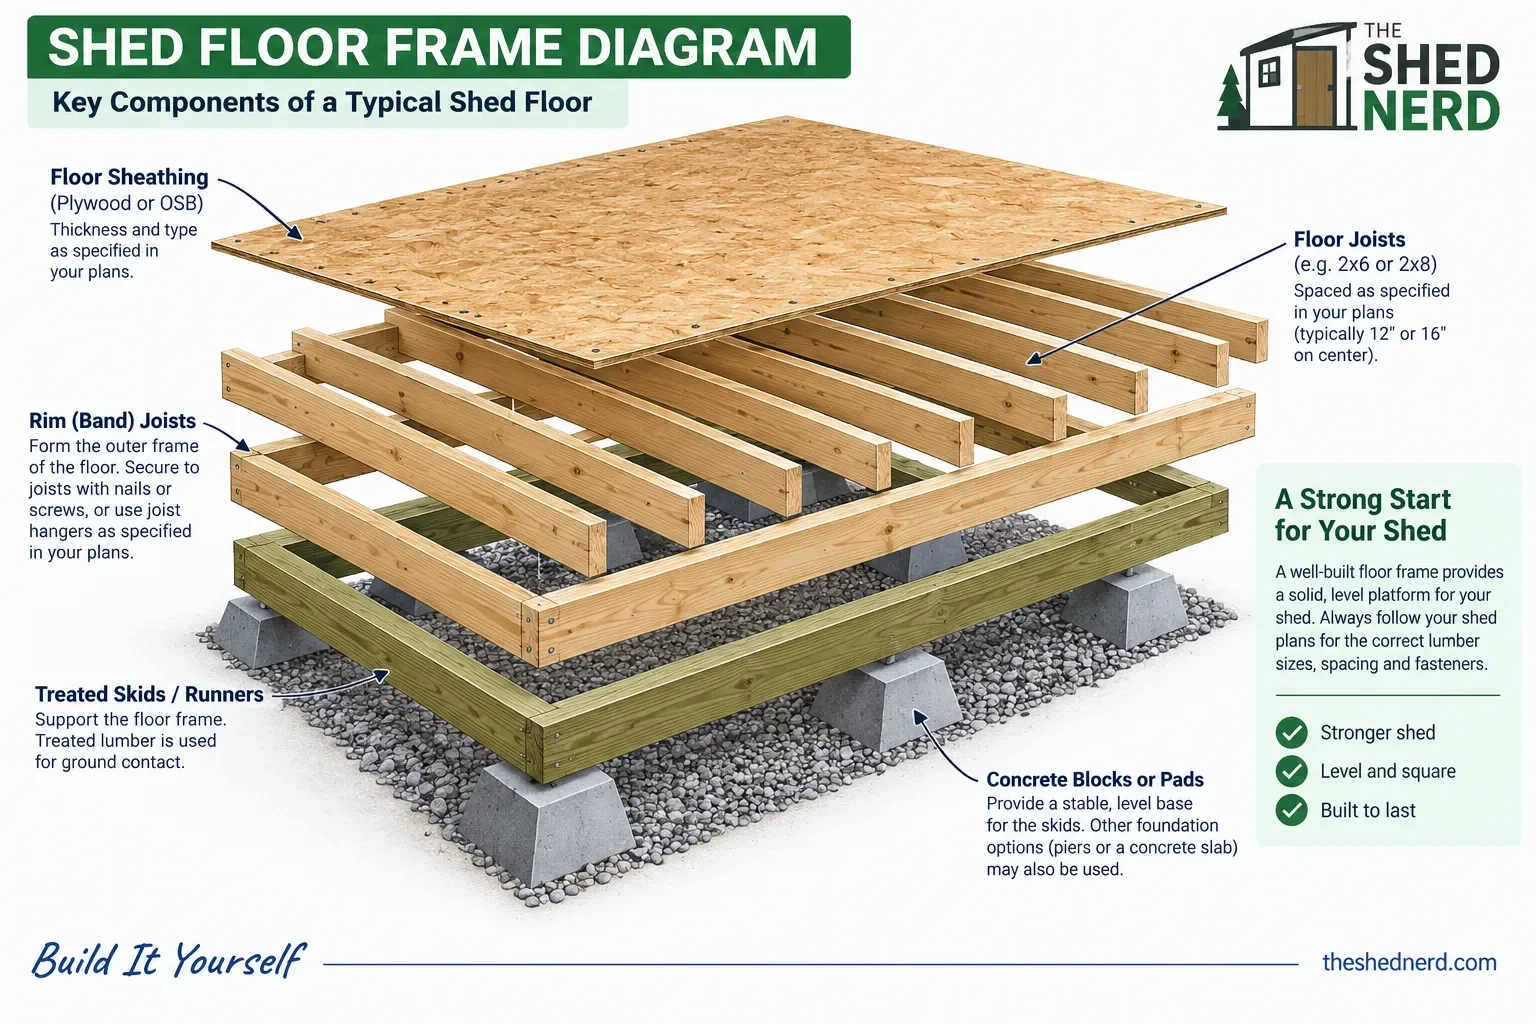
What Is a Shed Floor Frame
A shed floor frame is the structural wood platform that supports the floor sheathing and, ultimately, the contents of the shed.
A typical framed floor can include:
Treated skids or runners
Rim or band joists
Interior floor joists
Blocking where required
Floor sheathing
Fasteners
The arrangement depends on the shed design and the type of foundation underneath it.
Some sheds use treated runners or skids resting on gravel or concrete supports, while other designs may use piers, a slab or another foundation system.
The foundation should be prepared and level before the floor frame is installed.
Before You Build the Floor
Don't start cutting lumber until you've checked the shed plans and prepared the foundation.
Check the plans
Confirm:
Overall shed dimensions
Floor dimensions
Foundation type
Joist size
Joist spacing
Skid or runner layout
Floor sheathing thickness
Door location
Required fasteners
Your plans should be the primary reference for the specific shed you're building.
Prepare the foundation
The foundation needs to provide a stable, suitable base for the floor system.
For example, a shed may use:
Gravel and treated skids
Concrete blocks and treated skids
Concrete posts or piers
Concrete slab
The appropriate option depends on the shed, site, soil, drainage, climate and local requirements.
Our first guide in this series covers these options in more detail:
How to Build a Shed Foundation: 4 Options
Tools and Materials
The exact materials depend on your shed plans, but common tools for a wood floor frame include:
Tape measure
Framing square
Carpenter's pencil
Level
Drill/driver
Circular saw
Hammer or framing nailer
Clamps
String line
Safety glasses
Hearing protection
Typical materials may include:
Pressure-treated lumber where required
Floor joists
Rim or band boards
Treated skids or runners
Structural fasteners
Floor sheathing
Approved connectors or joist hangers where specified
Always use the lumber dimensions and fasteners specified by your particular plans.
Step 1: Lay Out the Foundation Supports
Start by establishing the position of the foundation supports or runners.
If your design uses treated skids or runners, position them according to the plans.
The supports should be:
Properly positioned
Level
Stable
Aligned with the floor-frame dimensions
Take your time at this stage.
A floor frame can be assembled accurately, but if the foundation underneath it isn't level or correctly positioned, you'll have problems later.
For uneven sites, a different foundation system may be appropriate. Current guidance from This Old House notes that pier-and-beam foundations can be useful on sloped sites and that block-and-timber foundations can work on slightly uneven ground.
Step 2: Build the Outer Floor Frame
The outside boards form the perimeter of the floor.
Measure and cut the rim or band boards according to your plans.
Lay the boards out on a reasonably flat surface or directly on the prepared supports, depending on your construction method.
Before permanently fastening the frame, check:
Length
Width
Corner alignment
Level
Overall squareness
Don't rush this stage.
The outside frame establishes the dimensions that everything else will follow.
Step 3: Square the Floor Frame
This is one of the most important steps.
A rectangular frame can look square while actually being slightly out of alignment.
The easiest way to check it is to measure corner to corner diagonally.
Measure from one outside corner to the opposite corner.
Then measure the other diagonal.
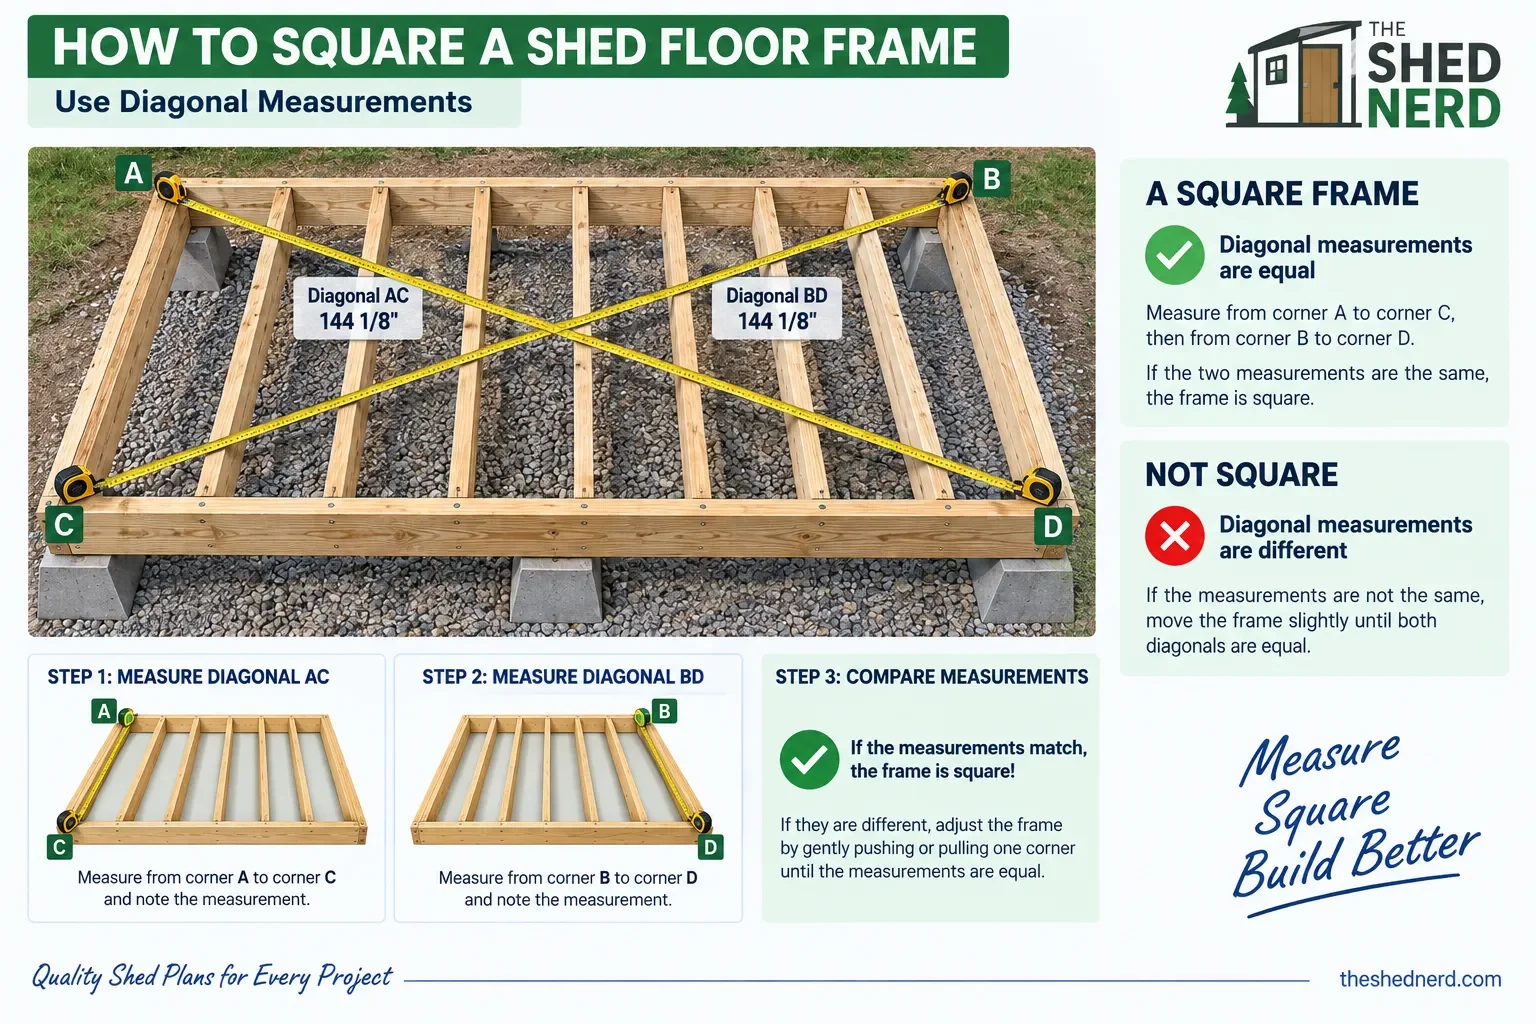
When the measurements match
If the two diagonal measurements are equal, the rectangular frame is square.
If they are different, adjust the frame before permanently fastening everything.
Current shed-building instructions from Home Depot specifically recommend checking the floor frame diagonally to square it before moving forward.
This small check can make a big difference later.
Step 4: Mark the Floor Joist Locations
Once the perimeter is square, mark the joist locations according to your plans.
Joist spacing is normally shown on-center, meaning the measurement is taken from the center of one joist to the center of the next.
Your particular shed plans might call for a different spacing depending on the joist size, span, floor loads and design.
Don't automatically use a standard spacing without checking the plans.
Mark both sides of the frame so you can see where each joist belongs.
Step 5: Install the Floor Joists
Cut the floor joists to the lengths specified by the plans.
Install them between the perimeter members at the marked locations.
Depending on the design, joists may be:
Fastened directly through the rim boards
Installed using joist hangers
Supported by other framing members
Home Depot's current shed guide shows joists installed at the specified spacing and secured to the perimeter framing, with joist hangers used in that particular design.
Your plans should determine which connection method you use.
Keep the joists aligned
As you install each joist, check that:
It is positioned on the correct mark
Its top edge is flush with the surrounding frame
It is straight
The frame remains square
Small errors can accumulate if you don't check the frame as you go.
Step 6: Check the Floor Frame Again
Once all the joists are installed, stop and check your work.
Check:
Level
Use a level across the frame and in several locations.
Square
Measure both diagonals again.
Joist position
Make sure the joists remain at their specified locations.
Frame dimensions
Confirm the finished frame matches the dimensions in your plans.
This is the easiest stage at which to correct problems.
Once the floor is covered with sheathing and the walls are installed, correcting an error becomes much more difficult.
Step 7: Install Blocking if Required
Some floor designs require blocking between joists.
Blocking can help maintain joist alignment and provide additional support where specified by the design.
The amount and location of blocking depends on the shed plans.
Don't add or remove structural blocking simply because it appears in another shed design.
Follow the framing details for the shed you're building.
Step 8: Install the Floor Sheathing
Once the frame is level, square and properly fastened, install the floor sheathing.
Common flooring materials can include plywood or other structural floor panels approved for the application.
Check your plans for the specified thickness and material.
Lay the first sheet carefully so that the edges align with the framing.
Then continue across the floor.
Where multiple sheets are required, follow the panel layout shown in the plans and avoid creating unnecessary continuous seams.
Home Depot's current shed guide recommends using the first sheet of floor sheathing to help confirm the frame remains square, then continuing with the remaining sheets and staggering seams.
Step 9: Fasten the Floor Sheathing
Fasten the sheathing using the fasteners and spacing specified by your plans.
The exact fastener type and spacing should not be guessed because it can depend on the panel type, framing and local requirements.
If your plans specify construction adhesive, joist adhesive or particular fasteners, follow those instructions.
After the panels are installed, inspect the floor for:
Loose areas
Raised edges
Gaps that don't match the plan
Uneven surfaces
Missing fasteners
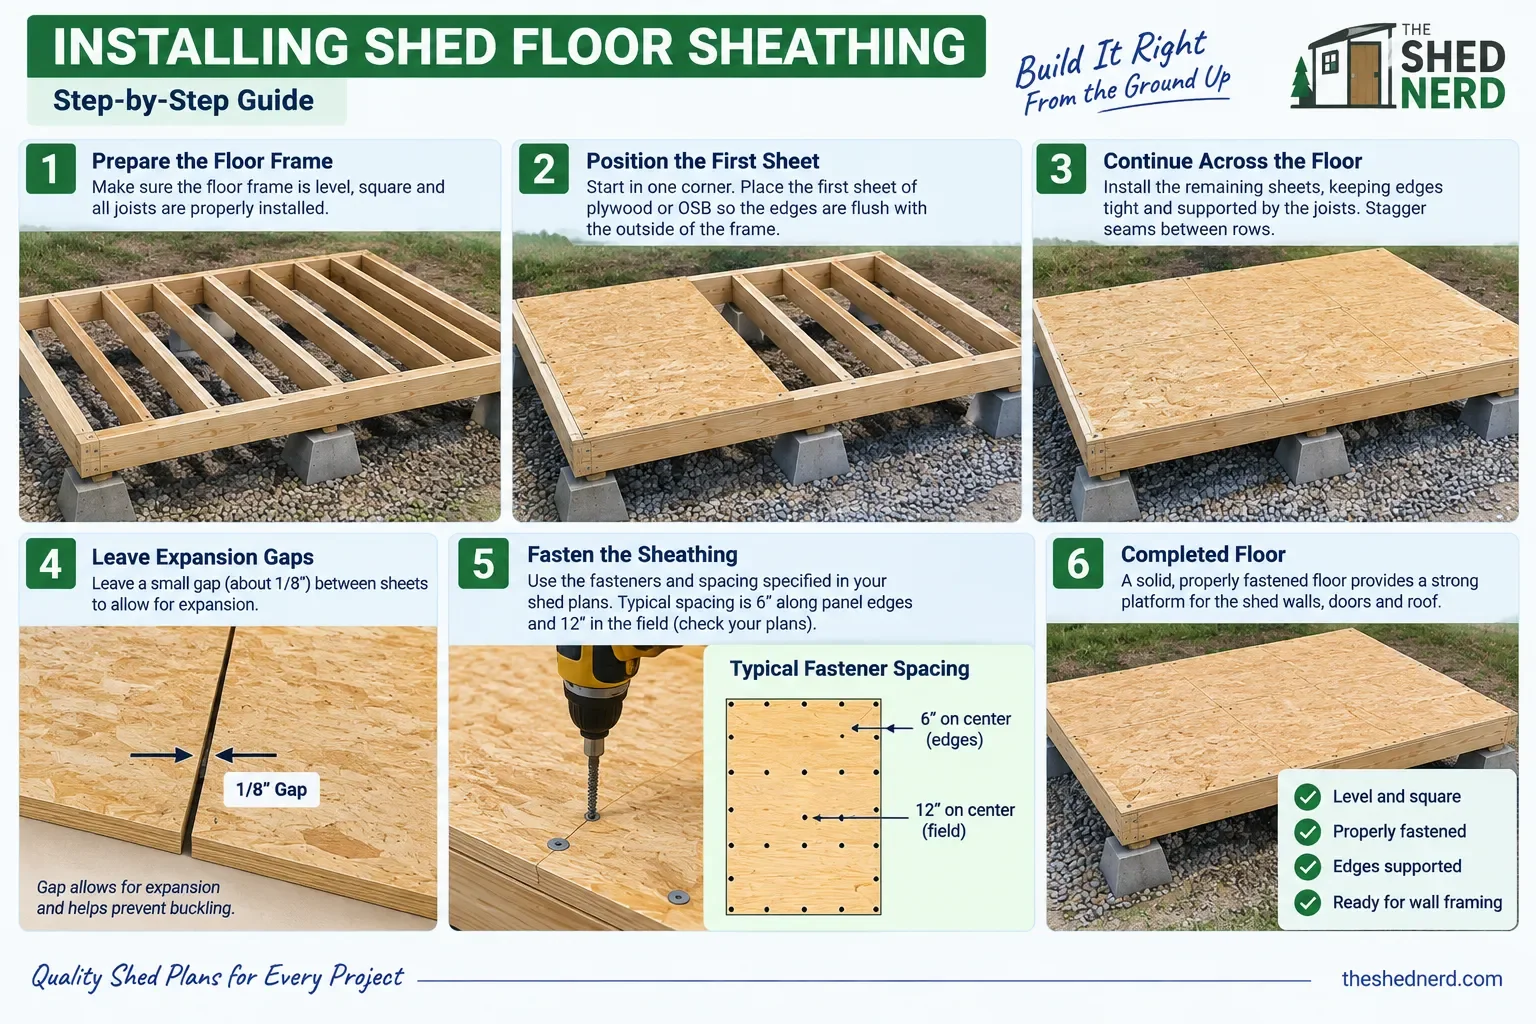
The finished floor should provide a solid, stable platform for the walls.
Step 10: Check the Finished Floor
Before moving on to the walls, perform one final inspection.
Check the dimensions
Does the finished floor match the plan?
Check the diagonals
Are the diagonal measurements equal?
Check the level
Is the floor level where it needs to be?
Check the framing
Are the joists properly positioned and secured?
Check the sheathing
Is it properly fastened and supported?
Check the foundation
Are the supports still properly positioned underneath the frame?
If everything checks out, you're ready to move on to wall framing.
Common Shed Floor Framing Mistakes
A few avoidable mistakes can create problems later.
Building on an unsuitable foundation
The floor frame can't compensate for a foundation that is unstable, poorly drained or incorrectly prepared.
Failing to check square
Don't assume the frame is square because the corners look right.
Measure both diagonals.
Using the wrong joist spacing
Don't automatically copy the spacing from another shed.
Use the spacing specified by your plans.
Installing the floor before checking the frame
Once the sheathing is attached, correcting the frame becomes more difficult.
Check everything first.
Ignoring moisture exposure
Use materials appropriate for their location and exposure, particularly where wood contacts masonry or is close to the ground.
Current framing guidance from This Old House emphasizes using pressure-treated lumber where framing is next to masonry because of moisture exposure.
How to Make Sure Your Shed Floor Is Square
Remember the simple diagonal test.
Imagine the floor as a rectangle:
Corner A → Corner C
and
Corner B → Corner D
Measure both diagonals.
If the measurements are equal, the rectangular frame is square.
If they aren't equal, adjust the frame before continuing.
This is one of those simple checks that takes very little time but can save considerable frustration when you start framing the walls.
Estimate Your Shed Floor Materials
Once you know your shed dimensions and floor design, a material estimate can help you prepare for the project.
The Shed Material Estimator Calculator can provide approximate quantities based on the dimensions and options you enter.
It supports both Imperial and Metric measurements and includes options for floor joists, foundation types and other shed components.
Try the Shed Material Estimator Calculator
Remember that the calculator is a planning tool, not an engineered takeoff. Compare its results with your specific shed plans before purchasing materials.
Before You Start Framing the Walls
Your completed floor becomes the working platform for the next stage of the build.
Before moving on, make sure:
The floor is square
The floor is level
The foundation supports are properly positioned
The joists are correctly installed
The sheathing is securely fastened
The floor dimensions match your plans
Getting these details right now makes the next stage much easier.
Next in the Shed Building Guide
How to Frame Shed Walls
We'll take the completed floor platform and use it to lay out, build and raise the shed walls.
Final Thoughts
Building a shed floor frame isn't simply a matter of assembling some lumber and covering it with plywood.
The foundation, frame dimensions, joist layout, squareness, level and floor sheathing all work together to create the platform that supports the rest of the shed.
Take your time with the layout and check the frame before moving on.
A few extra minutes with a tape measure, level and framing square can make the rest of the build considerably easier.
Before you buy materials, building a shed starts with a clear plan explore these step-by-step shed building plans to get started.