

Once the shed roof framing is complete, the next step is protecting the building from weather. Installing the roofing involves more than simply putting shingles over the rafters. The roof needs a suitable deck, edge protection, underlayment and roofing material installed in the correct sequence.
This guide explains the main steps involved in how to install shed roofing, using asphalt shingles as the primary example. Always follow the instructions supplied with your roofing products and check local building requirements before starting.
1. Check the Shed Roof Before Roofing
Before installing any roofing materials, inspect the completed roof frame carefully.
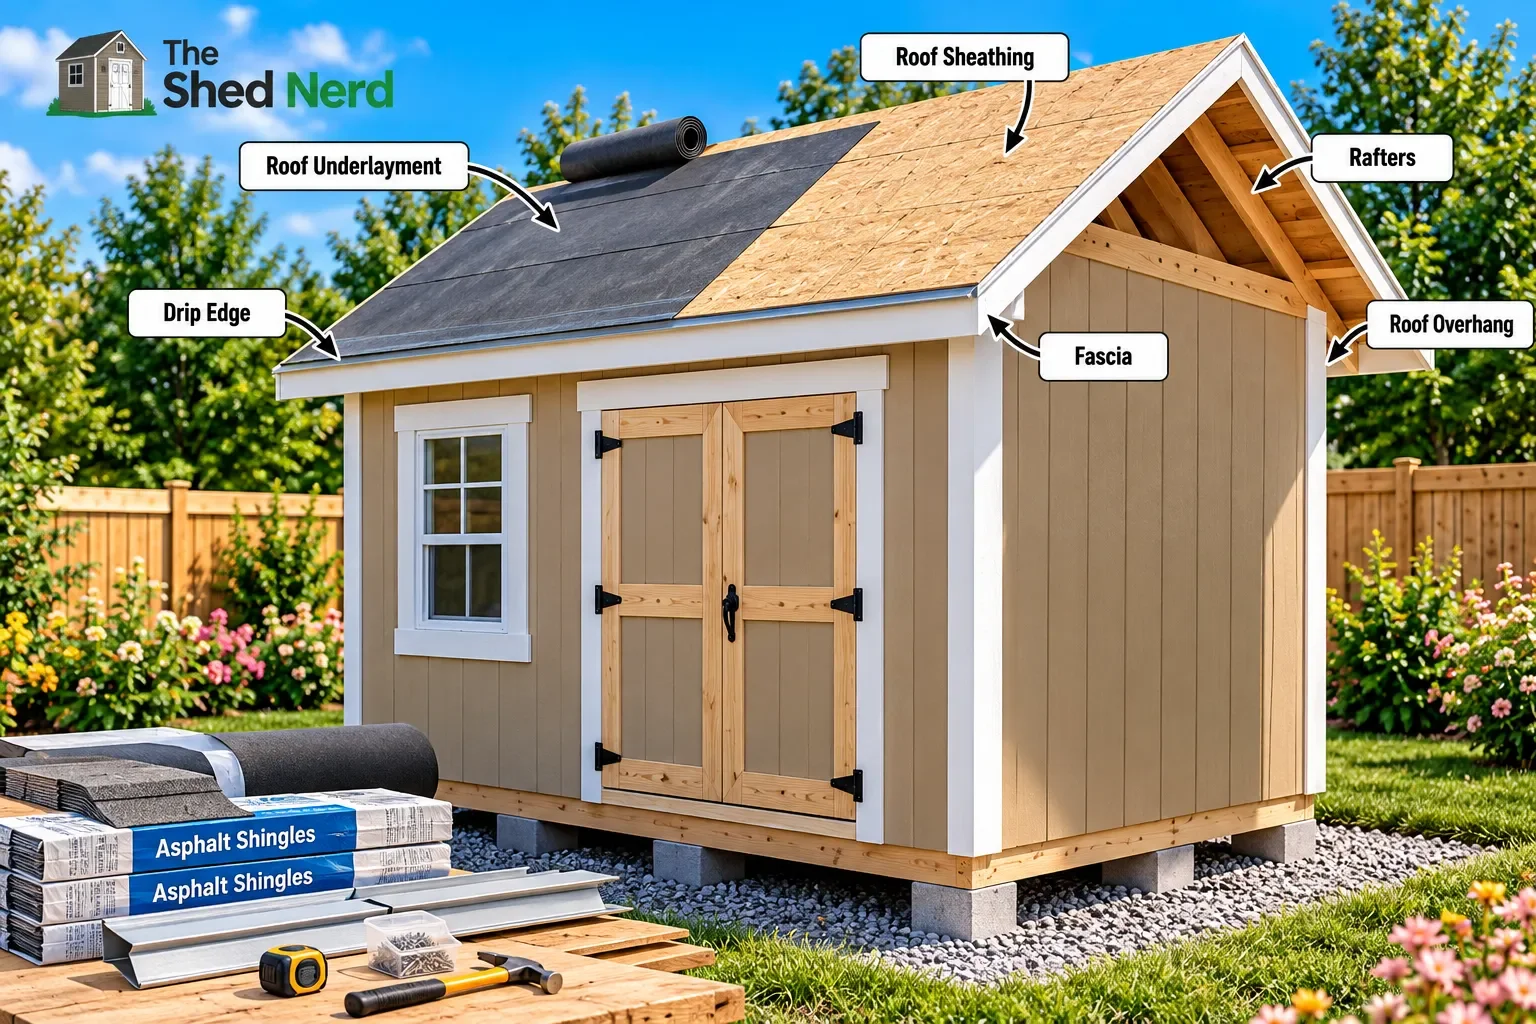
The rafters or trusses should be properly secured, and the roof should be straight and ready to receive the sheathing. Check that the roof overhangs, fascia and gable ends match the dimensions shown on your shed plans.
This is also the time to make sure the roof structure is ready for the roofing system you have selected.
If you haven't completed the roof framing yet, our guide to how to build a shed roof walks through rafters, ridge boards, blocking, roof sheathing and other framing considerations.
2. Install the Roof Sheathing
Roof sheathing creates the solid surface that supports the roofing system.
Plywood or OSB may be used depending on your plans, local requirements and the roofing product. Install the panels according to the specifications for your project and make sure the panel edges are properly supported.
Fasten the sheathing securely to the roof framing using the specified fasteners and spacing.
Take your time during this stage. A straight, properly fastened roof deck makes the roofing work much easier later.
The roof sheathing should also be checked for protruding fasteners, damaged panels or uneven areas before continuing.
3. Install the Fascia and Check the Roof Edges
If your shed design includes fascia boards, install them around the roof edges before completing the roofing system.
The fascia provides a finished appearance around the roof and gives the drip edge a clean transition at the eaves and rake edges.
Check the edges from ground level as you work. Small alignment problems are much easier to correct before the underlayment and shingles are installed.
4. Install the Drip Edge
Drip edge is the metal flashing installed around the edges of the roof.
It helps direct water away from the roof deck and fascia while protecting the exposed edges of the roofing system.
The exact installation sequence can vary depending on the roofing system and manufacturer. For asphalt shingles, common guidance places drip edge at the eaves and rake edges, with the underlayment and flashing arranged according to the applicable instructions and requirements.
Cut the drip edge to length and secure it using the recommended roofing fasteners. Keep the sections properly aligned and overlap joints as specified.
Don't rush this step. The roof edges are important areas for controlling water.
5. Install the Roof Underlayment
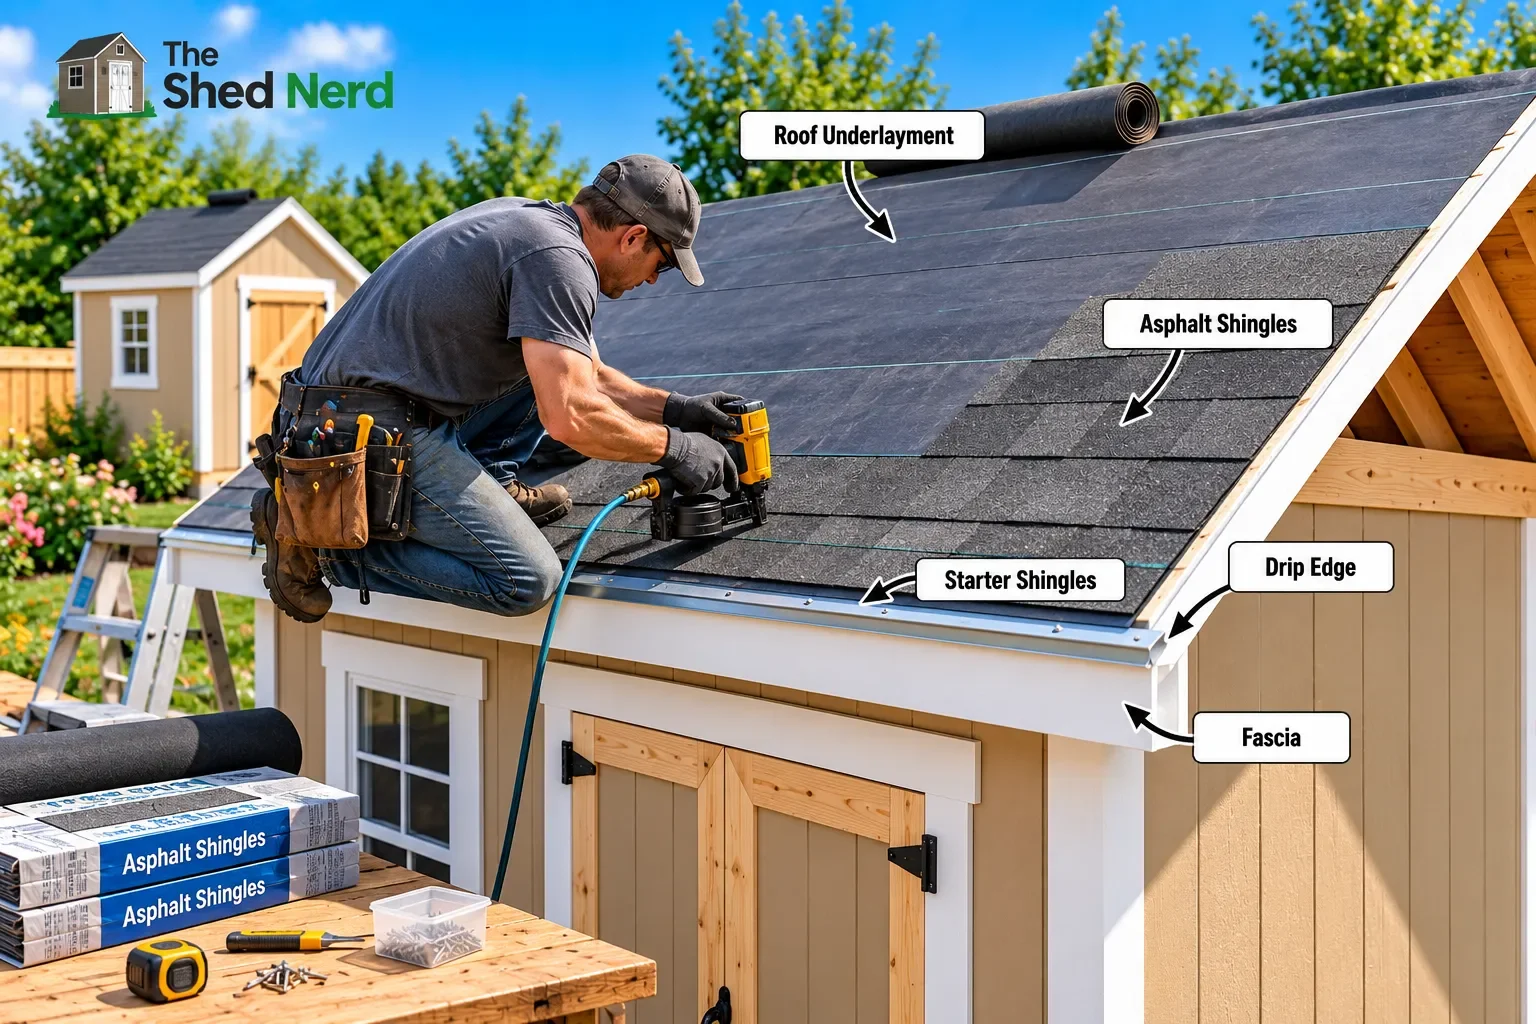
Roof underlayment provides another layer of protection between the roof sheathing and the final roofing material.
Depending on the product, you may use roofing felt, a synthetic underlayment or another approved roofing membrane.
Start at the lower portion of the roof and work upward, following the manufacturer's required overlap and fastening pattern. Keep the material straight, smooth and free from unnecessary wrinkles.
Underlayment installation can vary significantly between products, so follow the instructions supplied with the specific material you're using.
Some roofs and climates may also require additional leak protection or ice-and-water protection. Local requirements and product instructions should determine whether these materials are necessary.
6. Plan the Shingle Layout
Before installing the first shingle, take a moment to plan the layout.
Shingles need to be installed in straight, properly aligned courses with the joints staggered between rows. This helps create the overlapping pattern designed to shed water.
Use a chalk line where necessary to establish straight reference lines across the roof.
Also check the manufacturer's instructions for:
Shingle exposure
Nail placement
Required overhang
Starter-course requirements
Course alignment
Temperature limitations
Ridge-cap installation
The exact measurements should come from the roofing product you're installing rather than from a generic shed-building rule.
7. Install the Starter Shingles
Starter shingles form the first roofing course along the lower edge of the roof.
They provide a sealed starting edge for the main shingle courses and help establish the correct alignment.
Install the starter material according to the manufacturer's instructions, paying particular attention to its position relative to the drip edge.
Some roofing systems use purpose-made starter shingles, while others allow standard shingles to be modified for this purpose. Check the product instructions before choosing a method.
8. Install the First Course of Shingles
With the starter course in place, begin installing the main shingles.
Work across the roof, following the manufacturer's required exposure and fastening pattern.
Keep each shingle properly aligned with the previous one and check the course against your chalk line as you work.
The first few rows are especially important because any alignment error can become more noticeable as you move toward the ridge.
Avoid overdriving the roofing nails. The fasteners should secure the shingles without damaging the roofing material.
9. Continue Installing the Shingle Courses
Continue working across and upward until you reach the upper portion of the roof.
Stagger the joints between courses according to the shingle manufacturer's instructions. This creates the overlapping pattern that allows water to flow down the roof rather than through the joints.
As you work, periodically step back and check the roof from ground level.
Look for:
Straight horizontal courses
Consistent shingle exposure
Correctly staggered joints
Proper edge alignment
Correct fastener placement
If something begins to drift out of alignment, correcting it immediately is much easier than trying to fix it after several more courses have been installed.
10. Finish the Roof Edges
Once the main shingle courses reach the top and edges of the roof, complete the rake and ridge details required by your roofing system.
Trim shingles neatly where necessary and make sure the exposed roof edges are properly protected.
The exact edge treatment depends on the roofing product and shed design.
For a simple gable shed, the final work will normally include completing both roof slopes and preparing the ridge for the cap material.
11. Install the Ridge Cap
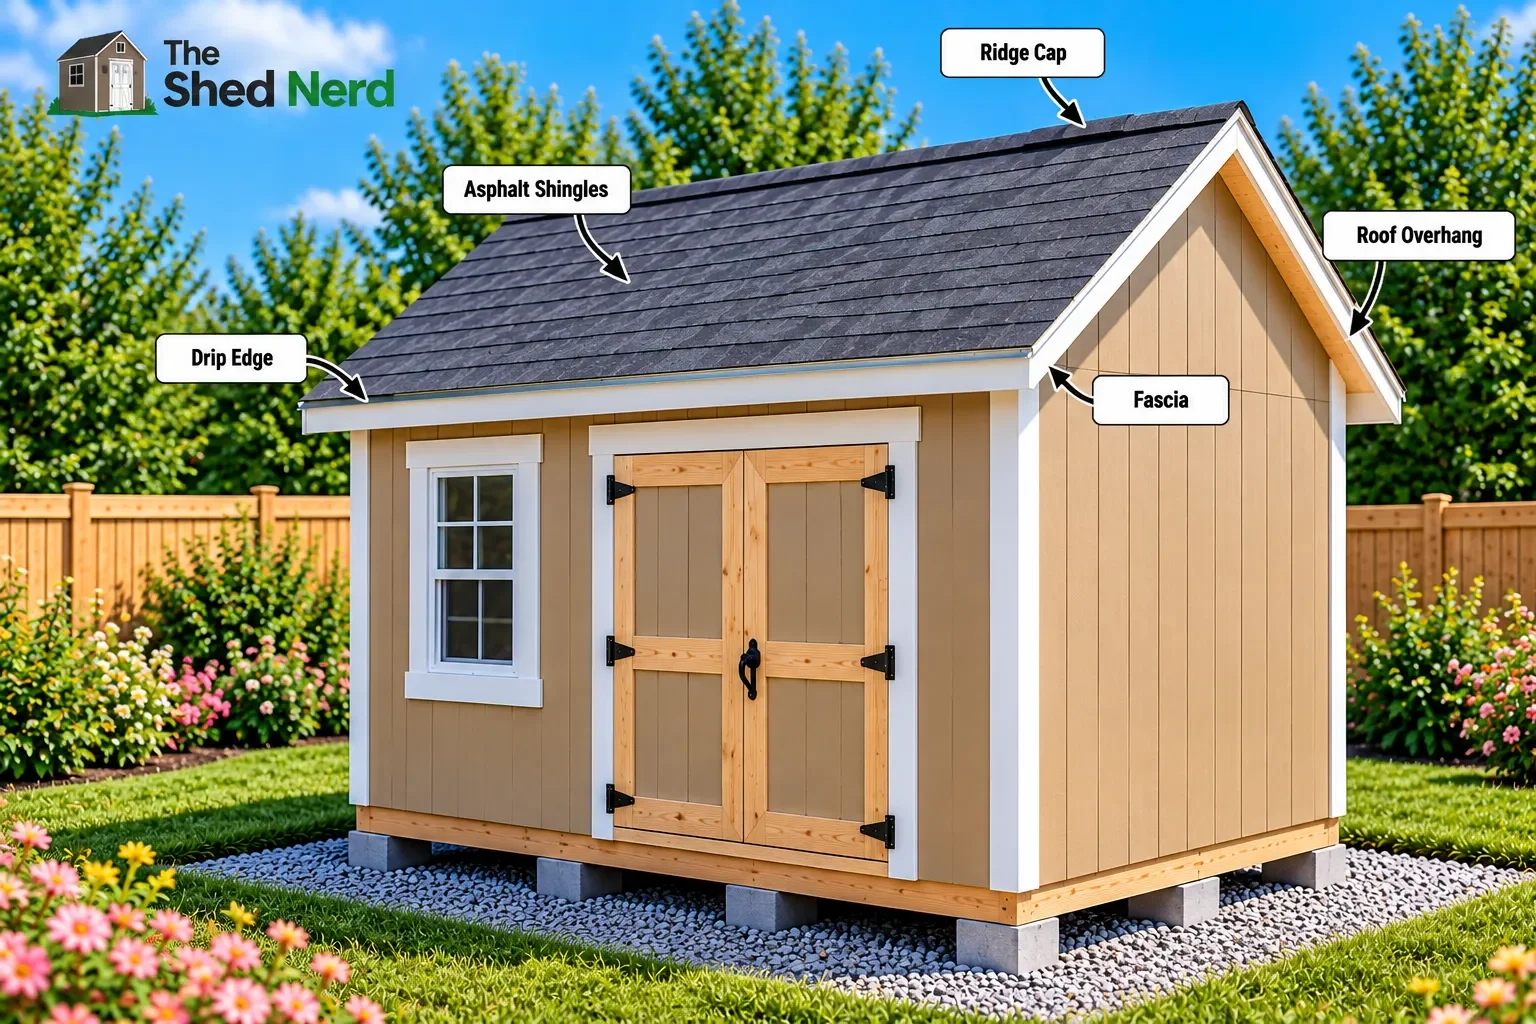
The ridge is the highest point where the two roof slopes meet.
Ridge-cap shingles or another approved ridge-covering system are installed over this area to protect the joint from weather.
Install the ridge cap according to the roofing manufacturer's instructions, including the specified overlap and fastener placement.
If your shed uses a ridge vent, the vent and ridge-cap system must be compatible and installed according to their respective instructions.
Don't block a designed ventilation opening with roofing material.
12. Check the Finished Shed Roof
After the roofing is installed, inspect the entire roof before considering the job complete.
Check the:
Shingle alignment
Roof edges
Drip edge
Ridge caps
Flashing
Exposed fasteners
Roof penetrations
Overhangs
Areas around vents or other openings
Look at the roof from several angles from the ground as well.
The finished roof should have clean, consistent courses and no obvious loose or damaged roofing materials.
Common Shed Roofing Mistakes to Avoid
A few mistakes can create problems later.
Skipping the underlayment
Shingles are not the only layer protecting the building. Use the roofing system specified for your project.
Installing shingles without checking the manufacturer's instructions
Shingle exposure, nail placement and starter requirements can differ between products.
Poor roof-edge detailing
The eaves and rake edges need appropriate drip-edge and flashing treatment.
Uneven shingle courses
Small alignment errors can become increasingly obvious as additional rows are installed.
Overdriving nails
Fasteners should hold the shingles securely without damaging them.
Ignoring roof safety
Roof work involves falls, sharp materials and tools. Use appropriate ladders, footwear, eye protection and fall protection where required. Roofing guidance from Lowe's specifically recommends appropriate safety precautions and fall protection for roof work.
How Much Roofing Material Do You Need?
The amount of roofing material depends on the actual roof dimensions, roof pitch, overhangs and the roofing product being used.
Measure each roof slope and calculate the total roof area before purchasing materials. Then account for the manufacturer's recommended waste factor and the additional material required for starter strips and ridge caps.
Your Shed Material Estimator Calculator can also help with approximate roofing quantities when planning a shed project.
Remember that a planning calculator provides an estimate rather than a final construction takeoff. Your actual shed plans and roofing manufacturer's requirements should take precedence.
What's Next?
Once the shed is protected by a finished roof, the main construction work is almost complete.
The next stage is finishing and protecting the shed so the exterior can withstand weather and everyday use. That includes protecting the siding and trim, sealing exposed wood, finishing the doors and windows, and dealing with the small details that help extend the life of the building.
You can continue through the Shed Building Guide:
From Foundation to Finished Shed as you work through the remaining stages.
Final Thoughts
Learning how to install shed roofing is about building a complete roofing system rather than simply covering the roof with shingles.
A solid roof deck, properly installed edge protection, suitable underlayment and correctly installed roofing material all work together to keep the shed dry.
Take your time with the layout and follow the instructions for the specific roofing products you're using. A careful installation at this stage can protect everything you've built underneath it.
Ready to Choose Your Shed Plan?
Once you understand the main stages of shed construction, having a detailed plan can make the project easier to organise.
Explore different shed sizes, styles and layouts to find a design that fits your project.